Depending on the user's membership, he or she can upload a number of photos, videos, send a number of messages, have a number of friends, etc... This is what you define in the Membership section. You do not define here the availability of the membership, just what the membership has to offer.
E.g.: Let's say you create the Membership A that has 5 photos, 5 videos, 5 friends and Membership D that has 0 photos, 0 videos, 0 friends.
2. Pricing
Depending on the time period, you can set the prices for the memberships defined on the memberships section.
E.g.: You want to provide Membership A in 3 time periods:
- 1 Month for 10$
- 3 Months for 20$
- 6 Months for 30$
3. Default membership
When signing up, users need to be assigned to a default membership. You can define in the Membership section which is it. The default membership is available for an unlimited period of time for all users!
E.g.: you set Membership D as the default one. Users won't be "allowed" to have much fun on the site with that one.
4. Trial membership
A user has the default membership, Membership D and would like to purchase Membership A. But before he'd like to give it a try, for free. This is where a Trial membership comes in. In pricing, beside the 3 prices for Membership A, you create a fourth one, that's a trial membership: e.g.: 24 hours. So now, the user can apply for the trial membership and after it expires he can decide if he wants to upgrade or not.
You can add a Trial membership from backend -> Love Factory -> Pricing -> New -> Make sure "Trial Membership:" is set to yes.
For the Trial membership you can set the time period in hours, you can set if it's available always ("Available always:") or can be activated only in certain time interval ("Available from:" - "Available until:").
After you add a new Trial membership, it will show up on the frontend on the Memberships page.
All new users who register with the Love Factory, are assigned to level 0. This level is the default one and it is FREE of charge. The purpose of the other 3 levels (1, 2 and 3) is to give the users a better site experience (like having more photos or more friends) by PAYING a fee.
So, if you don't want to have any membership plans or don't want users to pay, disable the levels 1, 2 and 3. This way the parameters of level 0 will affect all the users, FREE of charge.
If you want users to PAY, set the level 0 parameters to the minimum you want free users to have. Then increase those with each level.
For example: for level 0 set the number of maximum friends to 1, for level 1 set it to 2, for level 2 set it to 5 and for level 3 set it to 10. This way all users will be able to have 1 friend. But if they want more friends, they should apply for a membership plan that suits their needs.
Dating sites have become very popular in the fast paced society we live in today. Going out and meeting people in person is becoming harder and harder because of the long working days and busy schedules. Many people work from PC’s and can’t afford the time for social events, this is where social networking and dating sites come in.
Dating and Matchmaking websites have thousand of members which share personal information, preferences and pictures among each other. Using a dating website can sometimes be more effective than real life for some people since the first step is always the hardest, you get to know a persons character before you meet, thus allowing you to make a decision without wasting time on a boring date.
What is a Payment Gateway Integration?
Ads Factory has an embedded engine of administrating Payment Processor Parameters and interaction with payments of ads related items. Each Gateway is conceived as a plugin automatically loaded if configured. All Payment Gateways Plugins are stored in the components/com_adsman/plugins/payment/ and they are all extending the payment_object generic gateway. In the Ads Factory 1.5.8 installation are included payment gateways plugins for PayPal, Moneybookers and 2checkout.
A plugin for gateway Example can include the files:
pay_example.php
pay_example.en.php
pay_example.notify.php
External js,css or images are optional to design matters.
How do I create one gateway plugin?
First we create the php file containing the Payment Gateway processing Class. The file and the class must be named identically (of course the file must have a .php extension) having the name prefixed by `pay_`. ( a plugin for gateway Example must have the class name pay_example and the file name pay_example.php ).
For start the file should contain the following:
	< ?php
	// no direct access
	defined( '_JEXEC' ) or die( 'Restricted access' );
	define('EXAMPLE_LOG',0);

	require_once(ADS_COMPONENT_PATH."/plugins/payment/payment_object.php");

	class pay_example extends payment_object{
		var $_db=null;
		var $classname="pay_example";
		var $classdescription="Example Payment method";

		var $ipn_response=null;
		var $action=null;

		function pay_example(&$db){

			parent::payment_object($db);
			$this->action="PAYMENT URL OF THE GATEWAY";

		}

		function ipn($d){
			// TO DO
		}
		function show_admin_config()
		{
			// TO DO
		}
		function save_admin_config()
		{
			// TO DO
		}
		function show_payment_form($order_id,$item_description,$itemname,$quantity,$price,$currency,$return_url=null)
		{
			// TO DO
		}

		function log_ipn_results($success) {
		  if (!EXAMPLE_LOG) return;  // is logging turned off?

		}

		function validate_ipn()
		{
			// TO DO
		}
		function getLogo()
		{
		}

	}
function ipn($d)
processes the Gateway IPN (the $d param will be an array with the request values - $_REQUEST).
show_payment_form($order_id,$item_description,$itemname,$quantity,$price,$currency,$return_url=null)
this function MUST be overwritten. It is the Gateway specific part. Here you display the HTML needed for the payment form. Specific to each Payment processor. Parameters are:
$order_id – unique identifier for the transaction.
$item_description – the description of the product (payment item) the user is paying for. You should display this in order to confirm this with the user.
$itemname – this is the PAYMENT ITEM internal name. YOU have to pass it on, so that it gets back per IPN. If no IPN is needed, then you can ignore it.
$quantity – the amount of item the user purchases; most time it is one.
$price – the item price.
$currency – the currency you set up in payment item admin.
$return_url – the url to pass the gateway as return url after payment was processed. (IT IS NOT THE IPN URL).
show_admin_config()
* this function MUST be overwritten. It displays the ADMIN form for configuring the Processor. For instance you can ask the moneybookers email.
* very important- the form must look like this:
save_admin_config()
* in this function you save the variables from the config form in the database.
* you must use the PARAMS field of the #__ads_paysystems table in the row for your payment system (where classname='$this->classname')
* We recommend to format the parameters like standard joomla parameters (variablename=value\n)
* Have a look at the Moneybookers class to see an example.
getLogo()
* overwrite this if you want to place the Processor logo somewhere else then in
/plugins/payment/{$this->classname}.gif or /plugins/payment/{$this->classname}.png or /plugins/payment/{$this->classname}.jpg
* you can specify an external image.
For payment gateways with IPN APIs you must create the pay_example.notify.php file and you can use one of the existent gateways as example.
Install and ready to go
After creating and copying the files in the components/com_adsman/plugins/payment/ directory you must create a database record in the `#__ads_paysystems` table and ready for configuration and paying.
Revised "Ads Factory" version 1.5.8.
What is a Payment Gateway Integration?
JAnswersFactory has an embedded engine of administrating Payment Processor Parameters and interaction with payments of Janswers related items. Each Gateway is conceived as a plugin automatically loaded if configured. All Payment Gateways Plugins are stored in the components/com_jooanswers/plugins/payment/ and they are all extending the payment_object generic gateway. In the JAnswersFactory 1.1.4 installation are included payment gateways plugins for PayPal, Moneybookers and 2checkout.A plugin for gateway Example can include the files:
pay_example.php
pay_example.en.php
pay_example.notify.php
External js,css or images are optional to design matters.
How do I create one gateway plugin?
First we create the php file containing the Payment Gateway processing Class. The file and the class must be named identically (of course the file must have a .php extension) having the name prefixed by `pay_`. ( a plugin for gateway Example must have the class name pay_example and the file name pay_example.php ).For start the file should contain the following:
< ?phpfunction ipn($d)
// no direct access
defined( '_JEXEC' ) or die( 'Restricted access' );
define('EXAMPLE_LOG',0);
require_once(JPATH_COMPONENT_SITE."/plugins/payment/payment_object.php");
class pay_example extends payment_object{
var $_db=null;
var $classname="pay_example";
var $classdescription="Example Payment method";
var $ipn_response=null;
var $action=null;
function pay_example(&$db){
parent::payment_object($db);
$this->action="PAYMENT URL OF THE GATEWAY";
}
function ipn($d){
// TO DO
}
function show_admin_config()
{
// TO DO
}
function save_admin_config()
{
// TO DO
}
function show_payment_form($order_id,$item_description,$itemname,$quantity,$price,$currency,$return_url=null)
{
// TO DO
}
function log_ipn_results($success) {
if (!EXAMPLE_LOG) return;
// is logging turned off?
}
function validate_ipn()
{
// TO DO
}
function getLogo()
{
}
}
processes the Gateway IPN (the $d param will be an array with the request values - $_REQUEST).
show_payment_form($order_id,$item_description,$itemname,$quantity,$price,$currency,$return_url=null)
this function MUST be overwritten. It is the Gateway specific part. Here you display the HTML needed for the payment form. Specific to each Payment processor. Parameters are:
$order_id – unique identifier for the transaction.
$item_description – the description of the product (payment item) the user is paying for. You should display this in order to confirm this with the user.
$itemname – this is the PAYMENT ITEM internal name. YOU have to pass it on, so that it gets back per IPN. If no IPN is needed, then you can ignore it.
$quantity – the amount of item the user purchases; most time it is one.
$price – the item price.
$currency – the currency you set up in payment item admin.
$return_url – the url to pass the gateway as return url after payment was processed. (IT IS NOT THE IPN URL).
show_admin_config()
* this function MUST be overwritten. It displays the ADMIN form for configuring the Processor. For instance you can ask the moneybookers email.
* very important- the form must look like this:
save_admin_config()
* in this function you save the variables from the config form in the database.
* you must use the PARAMS field of the #__janswers_paysystems table in the row for your payment system (where classname='$this->classname')
* We recommend to format the parameters like standard joomla parameters (variablename=value\n)
* Have a look at the Moneybookers class to see an example.
getLogo()
* overwrite this if you want to place the Processor logo somewhere else then in
/plugins/payment/{$this->classname}.gif or /plugins/payment/{$this->classname}.png or /plugins/payment/{$this->classname}.jpg
* you can specify an external image.
For payment gateways with IPN APIs you must create the pay_example.notify.php file and you can use one of the existent gateways as example.
Install and ready to go
After creating and copying the files in the components/com_jooanswers/plugins/payment/ directory you must create a database record in the `#__janswers_paysystems` table and ready for configuration and paying.
In the Emoticons tab of the backend you can view all the emoticons available, Chat Factory allows you to add an unlimited number of emoticons, you can also edit available emoticons from here by clicking on their name or the Edit button after checking the box next to the emoticon you want to edit.
![]()
Clicking on New will take you to the page where you can create any desired emoticon.
Write the appropriate title in the Title space, the Text is what users have to write for the desired emoticon to be inserted in the text, the Published drop-box lets you choose if the emoticon will be available for use. Upload a file from your computer that will show when the respective text is typed.
Chat Factory also allows you to advertise on your website without any extra work with the use of Advertisements and IM Ads that will appear when using the chat.

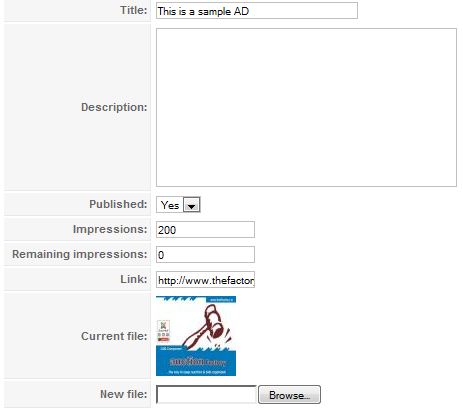
Clicking on New will open the new ad section, you can add a title, description,upload a file for the ad and post a link to the advertised website or product. For each ad you can set a number of impressions, the number of times the respective ad will appear on your website.
The other way of advertisement is with ads that display at a set interval to all chat users. In the IM Ads list view you can see all the ads on your website and their current state, published or unpublished, actions and the impressions.
Click on New to to create a new ad or click on the name of an existing one to edit it.
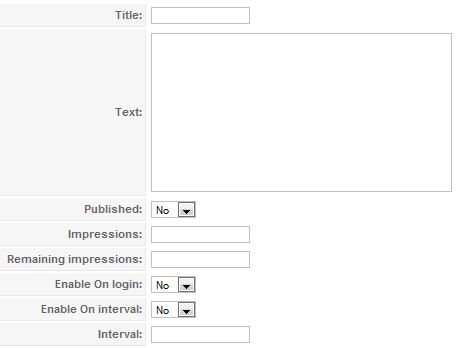
IM Ads are mostly the same as Advertisements, you enter a title, text and number of impressions. You can select if you want the ad to appear when users log in and on a set interval, in minutes.
In the Settings area you can configure your Chat Factory component to suit your needs best.
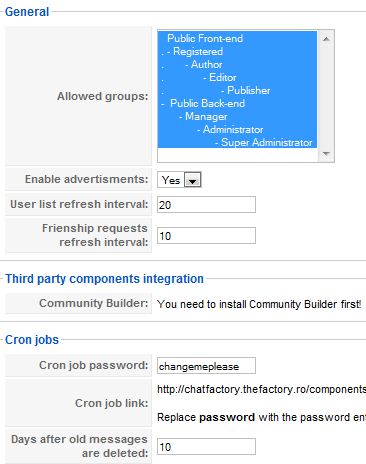
In the General settings tab you can select the groups of users that can use the chat, enable/disable advertisements, set the refresh interval for the user list or the refresh interval for friendship requests. Chat Factory also allows you to integrate with third party components via Community Builder. Here you can also set the Cron job password, link and how many days until old messages are deleted.
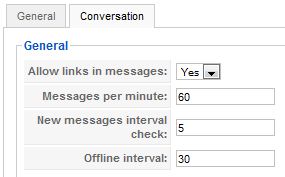
Under the Conversation settings tab you find 4 more settings for the Chat Factory component. You can allow users to send links via the messenger, set a limit for messages per minute to prevent spamming. You can set the interval at which the software checks for new messages and you can set an interval at which the user will be regarded as offline, this is set in seconds and must be greater than the new messages interval check.
On the About page you can find out if there are new versions and links to the developer.
Revised "Chat Factory" version 1.0.x.
