Chat Factory is an online chat extension for Joomla! that allows users on your website to instant message each other. This component is very useful if you wish to provide Live Help Support, you can interact with anyone on you website, even guests if you enable it and act as a salesman or simply inform people of what your website has to offer.
To enable the chat log in or use the Enable chat option, this icon also shows you if you are online or offline.
Guest users will have limited access or none at all to the chat depending on the administrative settings.
When logging in to the chat users will be greeted by a message or advertisement, Chat Factory is an excellent component to earn some money by use of it’s advertisement and IM ads features. You can charge impressions for ads, the number of times an ad will show and even charge for the time intervals at which the ads are displayed so they appear more frequently.
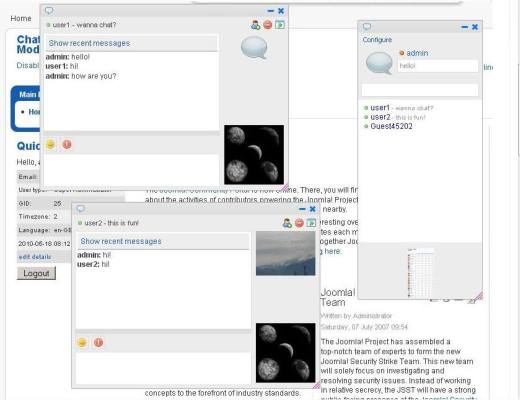
The Message window and user list have a familiar look so it is very easy to use, they may remind you of Yahoo! Messenger or other IM platforms.
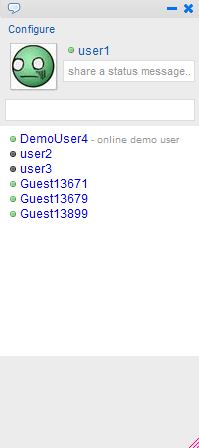
Users are displayed in list view with their name, an icon that shows their status and a status message. You can set your status and your status message on the right of your avatar. Users can be Available, Busy or Invisible. The Status message will appear after the user name on the list and will be seen by all other users.
Underneath your avatar and status options there is a search bar in which you can write the name or partial name of an user you are looking for.
The Configure button will take you to the configuration menu where you can set your Avatar, see blocked users and enable some general options.
Under the General tab you can enable guests to chat with you or if you want to see offline users in your list.
You can upload any avatar from your computer or use Community Builder.
If a user annoys you the block button that is shown in the message window will allow you to block him, this is where you can go to remove him from the blocked list.
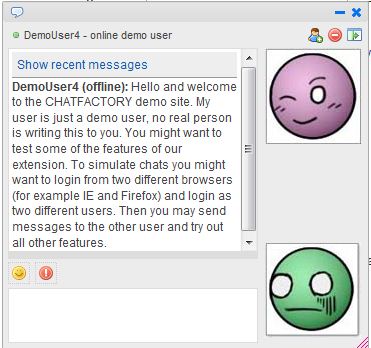
The message window is very straight forward and easy to use. The text windows has an emoticon insert button and a buzz button, emoticons can be inserted also by writing the respective text. Chat Factory also stores older messages which you can view by clicking on Show recent messages above the text window.
On the right of the text you see your avatar and the other users avatar above yours, you can hide or show them by clicking the 3rd button above his avatar. The 2nd button is for blocking or unblocking the respective user. The first button is the friend button, clicking on it will present the other user with a Friendship request.
Your friends will appear on your user list with a darker blue and on top of the rest. To remove a friend click on the friend icon again.
You can minimize windows you are not using and they will appear in the bottom left corner of the screen.
Inactive windows will appear as red, when you receive a message the minimized icon will turn blue, clicking on it will maximize it.
Revised "Chat Factory" version 1.0.x.
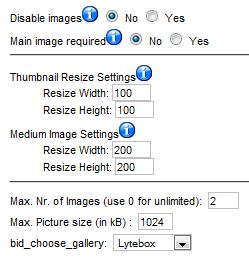
In the first tab you have the Image settings, here you enable or disable images, set the size, resolution, number of images a user can have and type of gallery.
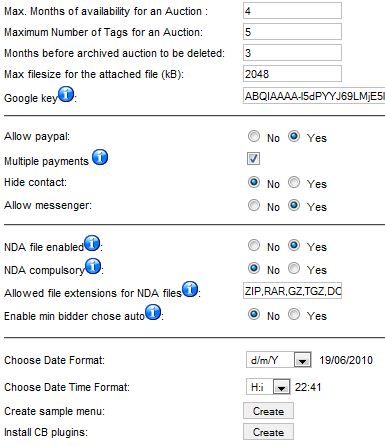
The Other Settings tab has details about the auctions, payments and some other key settings.
In the first section of the tab we have months an auction will be available, maximum number of tags, months before archived auction will be deleted, max file size for attachments and the Google key which you can get here.
The second section enables or disables Paypal, multiple payments messenger and hides or shows contacts.

for Joomla Powered Websites Only!
Before we get down to the business how to part, let us first get you familiar with the live chat component that will accomplish the above task.
Chat Factory is a powerful Ajax based live chat extension for Joomla (1.5 and 1.6) that will integrate Facebook & Gmail like chat into Joomla Websites. Think of it like having an instant messenger only for your website.
 | Partial features list:
|
After you install Chat Factory on your website, here are the ways you can put it to use:
- Increase Your Sales using it As a Live Help Support Tool. A website without live support is like an empty brick and motor store (with no one to guide you. With Chat Factory, you can interact with your website visitors through a real time chat communication providing a higher level customer and sales support. Doing this not only improves upfront sales and customer satisfaction but also increases referral rate and improves brand image (thus affecting the overall bottom line of your business).
- With the above said, think about this “How much is such a software worth to my business?” I’m sure you will discover that overtime, it’s worth 50 to 100 times more than what you are invest to grab the software.
| Ready to Implement?Like most other Joomla extensions, installing and configuring Chat Factory is very simple and in most cases the whole process takes less than 10mins to setup.Ready? Click on the "Buy it now" button below to grab your copy of Chat Factory! |
VM Factory Reports is the optimal tool for any VirtueMart based webshop. It offers statistical financial reports with Excel document export functionality, graphical display and also a must have print invoice utility.
The component is accessible in the backend area with the following functions:
1. Reports.
This is basically the area to display the financial status from your VM shop.
1.a. Monthly reports.
The monthly reports are presenting the values for each month.
- Month / Year
- Customers New / All
- Items / Orders
- Orders Status / Value
- Orders Status / Fee / Discount
- Tax
- Shipment / Value
- Payment / Value
- Total Month
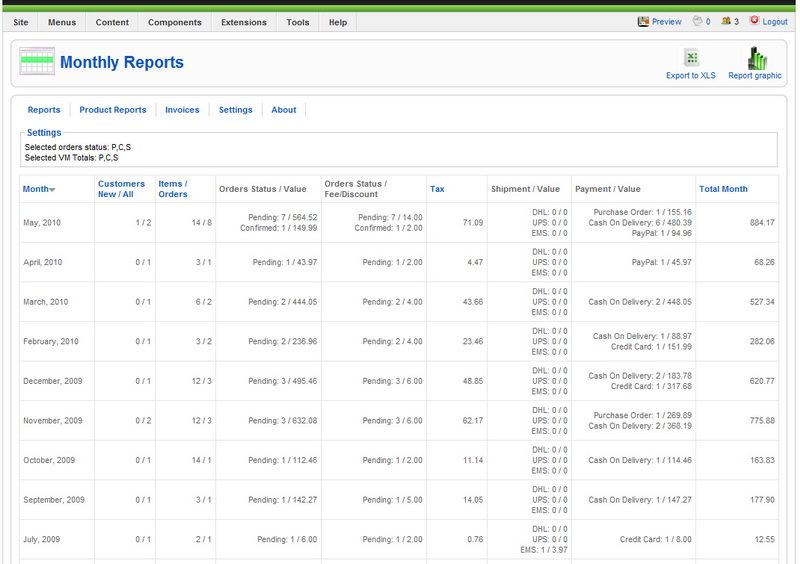
All selected monthly data can be exported into Excel document.
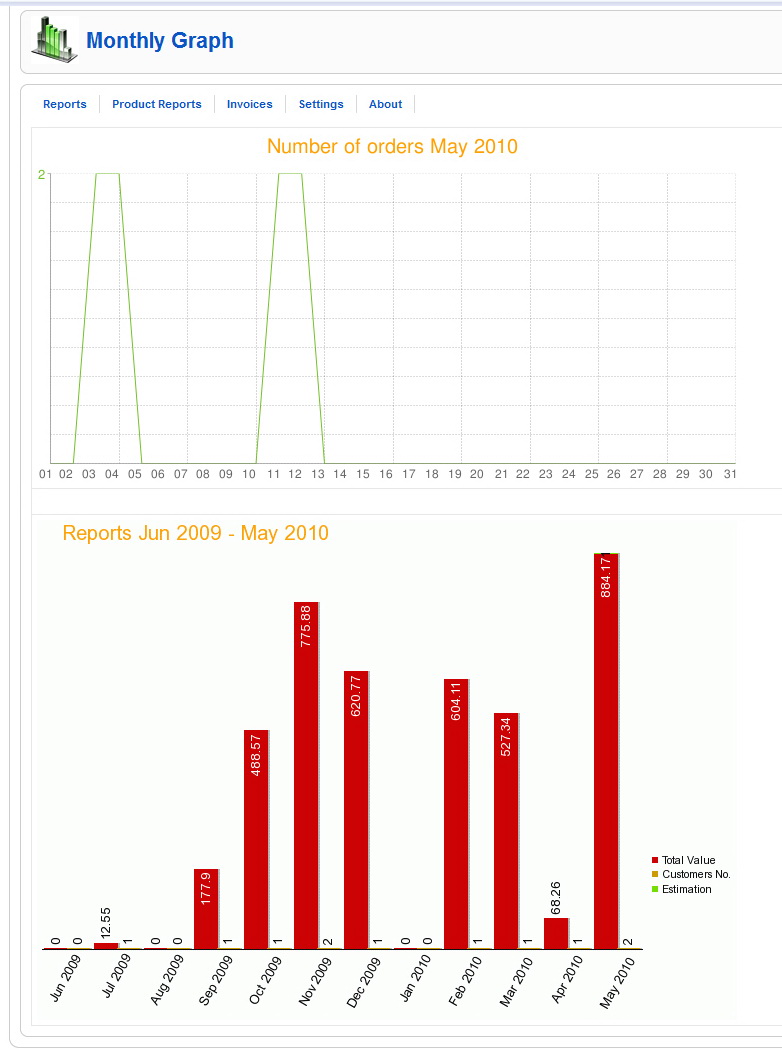
Two graphical reports are here available displaying:
- Daily number of orders per month
- Last 12 months report for: total value/customer number/current estimation.
1.b. Yearly reports.
The monthly reports are presenting the values for each month.
- Year
- Customers New / All
- Items / Orders
- Orders Status / Value
- Orders Status / Fee / Discount
- Tax
- Shipment / Value
- Payment / Value
- Total Year
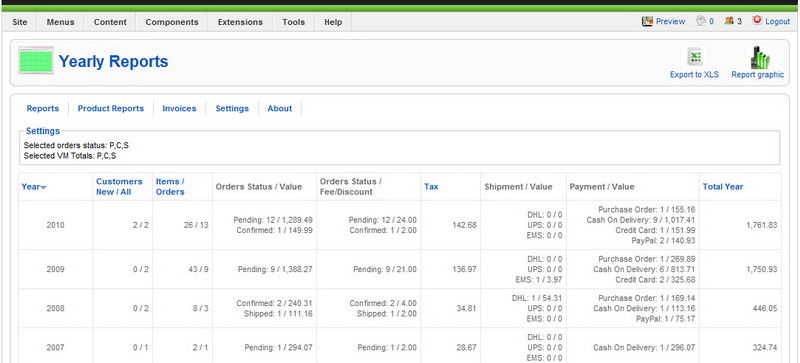
All selected yearly data can be exported into Excel document.
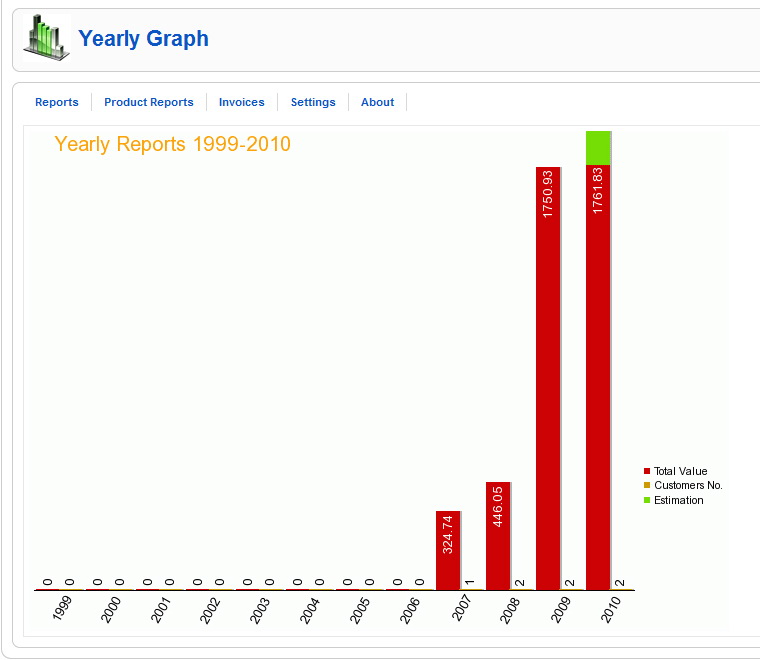
A graphical report is available displaying the yearly total values/customer number/current estimation.
Note:
Shipment Value = Shipping + Shipping Tax
Order Value (without taxes and shipment) = Subtotal + Fee (Discount or Fee)
Total = Item value + Fee or Discount + Tax + Shipment + Shipment Tax + Payment Tax
1.c. Statistics.
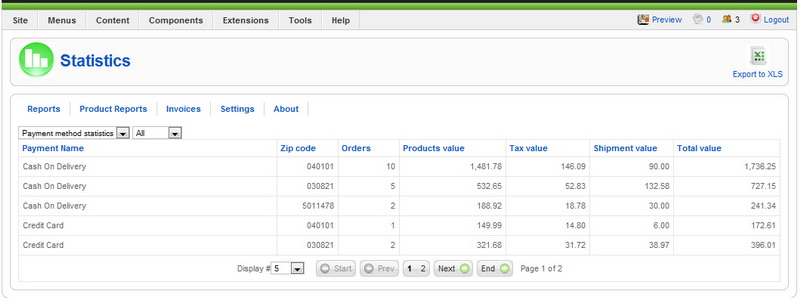
The statistics can display data of a certain selected month or all existing data from VM.
All the displayed statistics can be exported as a Excel document.
Customer statistics.
- Customer name
- Zip code
- Orders
- Products value
- Tax value
- Shipment value
- Total value

Location statistics.
- Location name
- Zip code
- Orders
- Products value
- Tax value
- Shipment value
- Total value
Shipping statistics.
- Shipping name
- Zip code
- Orders
- Products value
- Tax value
- Shipment value
- Total value
Payment Method statistics.
- Payment method name
- Zip code
- Orders
- Products value
- Tax value
- Shipment value
- Total value
2. Product Reports.
The product reports area display more specifically data, important for marketing strategies and planning.
2.a. All products.
This report displays:
- SKU
- Product name
- Stock quantity
- Stock value
- Sold quantity
- Orders
- Status
- Sold value
for a selected month or all existing VM data.
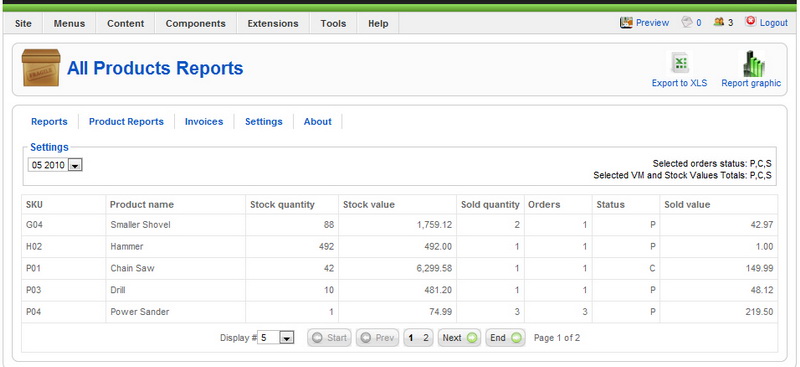
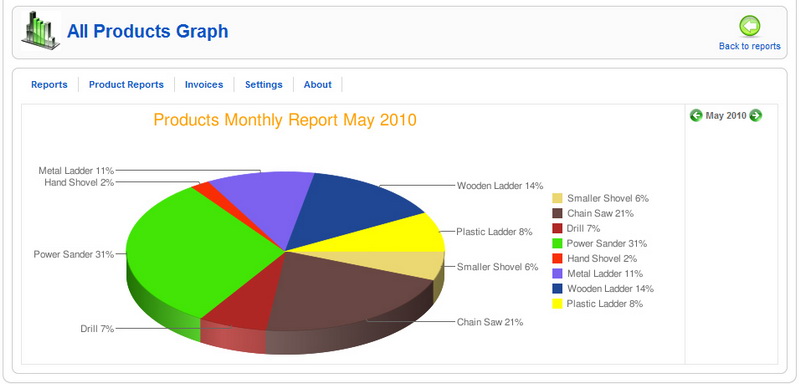
The data can be exported as Excel document and also a graphical report is available as a pie chart.
Note: Column stock quantity shows the total stock for all existing statuses.
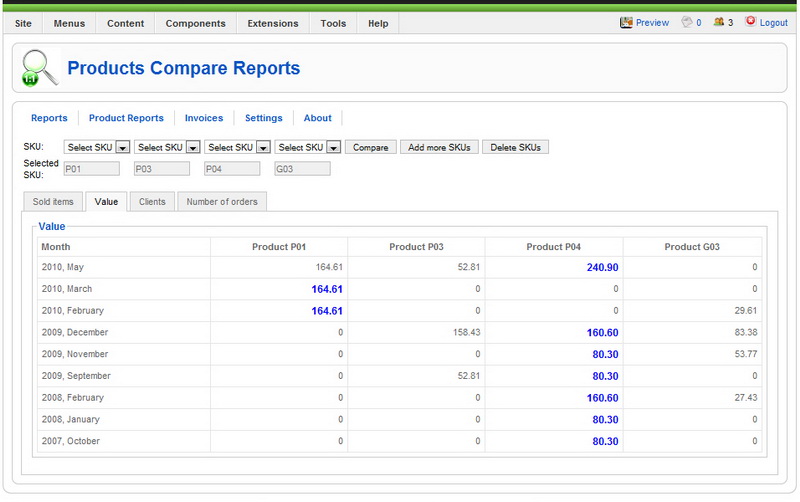
2.b. Compare products.
Enables the comparison between different products (by SKU) for
- Sold items
- Value
- Clients
- Number of orders
2.c. Compare attributes.
Enables the comparison between products with existing Attributes for a selected month or all existing VM data.
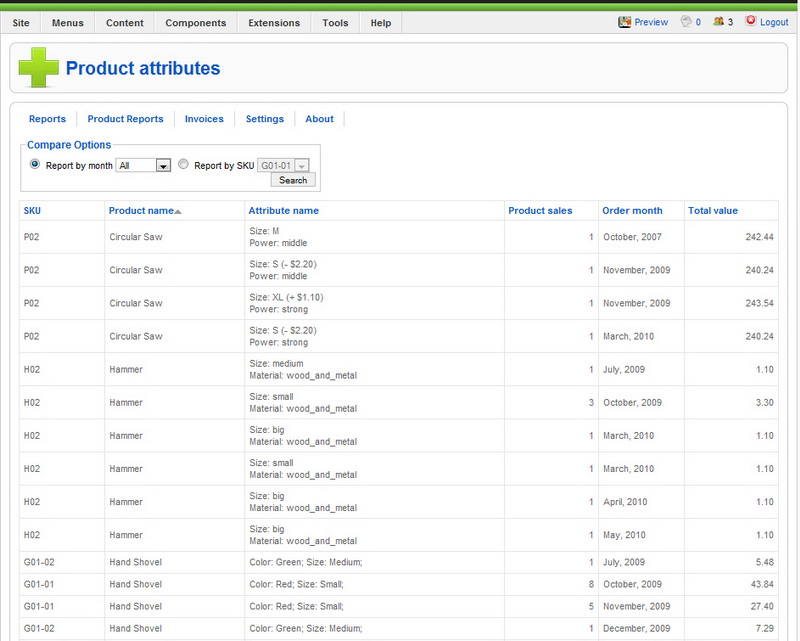
Note: The SKU dropdown will load only products with attributes. If no attribute present, the product will not display.
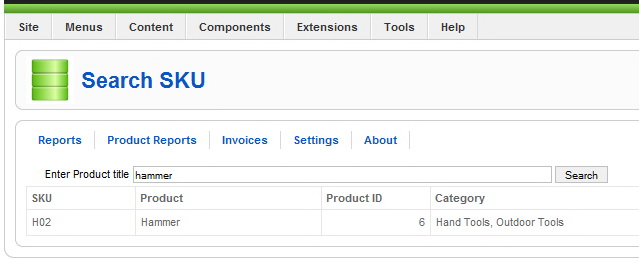
2.d. Search SKU.
Small utility to enter the product title and find out the SKU.
2.e. Reviews.
Displays the product reviews (with link), nr. of reviews and total rating.

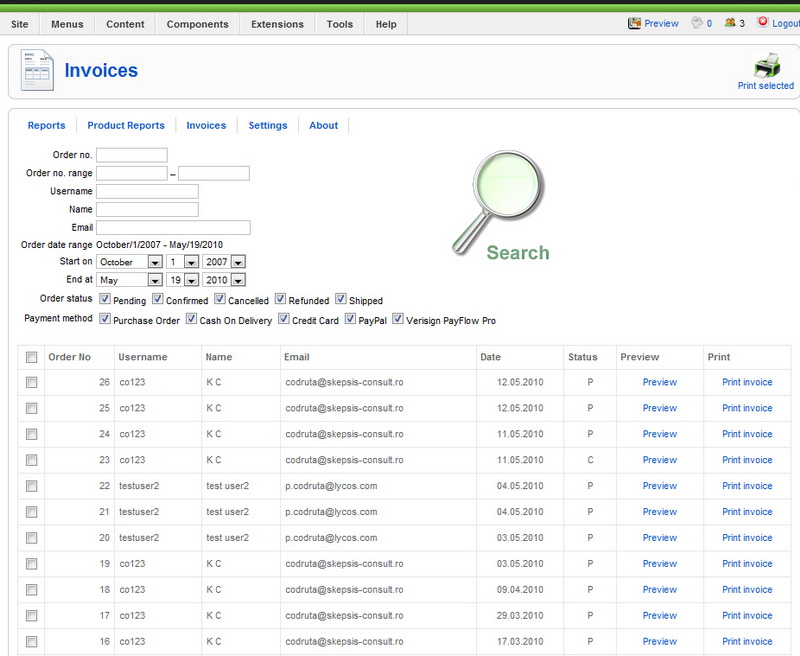
3. Invoices
In this area the administrator can search for a certain order or orders after the following criteria and print it out.
- Order no.
- Order no. range
- Username
- Name
- Order date range
- Order status
- Payment method
4. Settings.
This area has to be checked and configured by the administrator before the usage in order to obtain the needed information.
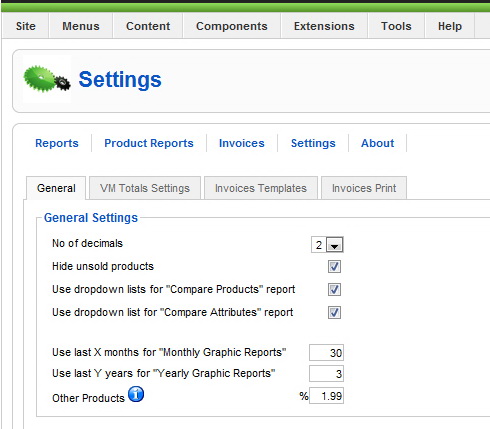
4.a. General settings
The following general settings are available for the VM Factory Reports extension:
- No of decimals
- Hide unsold products
- Use dropdown lists for "Compare Products" report
- Use dropdown list for "Compare Attributes" report
- Use last X months for "Monthly Graphic Reports"
- Use last Y years for "Yearly Graphic Reports"
- Other Products (set the percent to be allocated to the "Others" category in order to draw "All products" pie chart.
4.b. VM Total settings
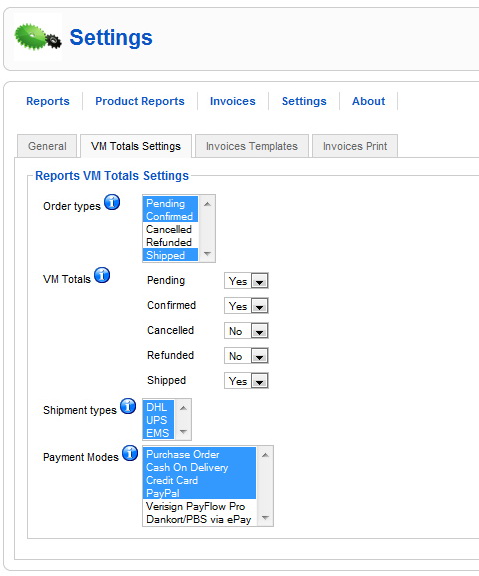
Under this tab the administrator can select the exact criteria to build the reports.
- Order types
- VM Totals (select which order type status should be considered as finalized and counted under the total value and stock labels)
- Shipment types
- Payment modes
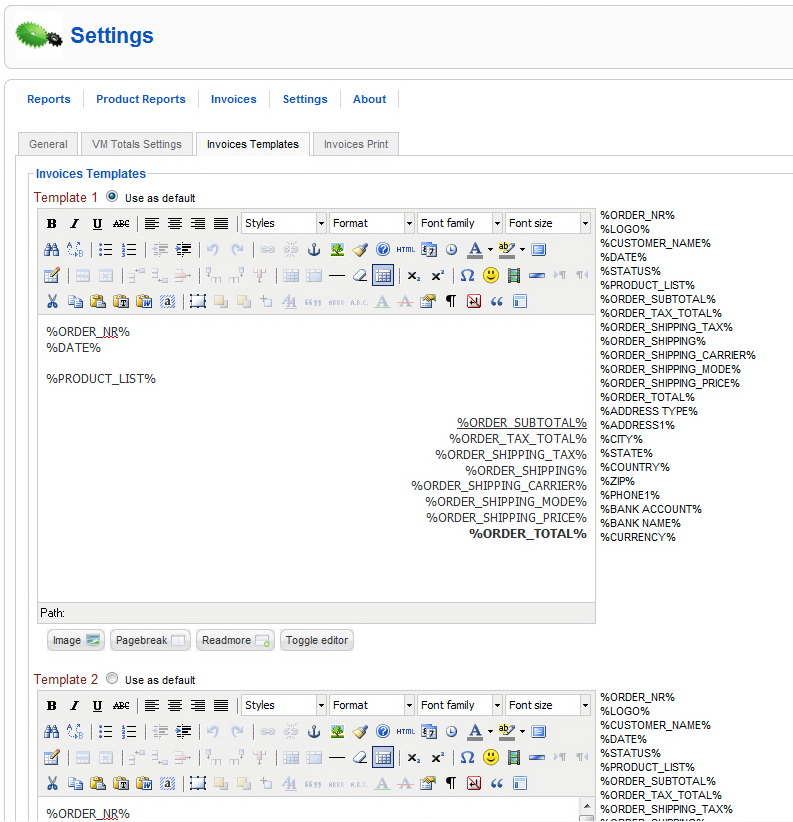
4.c. Invoices Templates
Four different templates are available to be configured. The default one is set by clicking a radio button.
4.d. Invoices Print
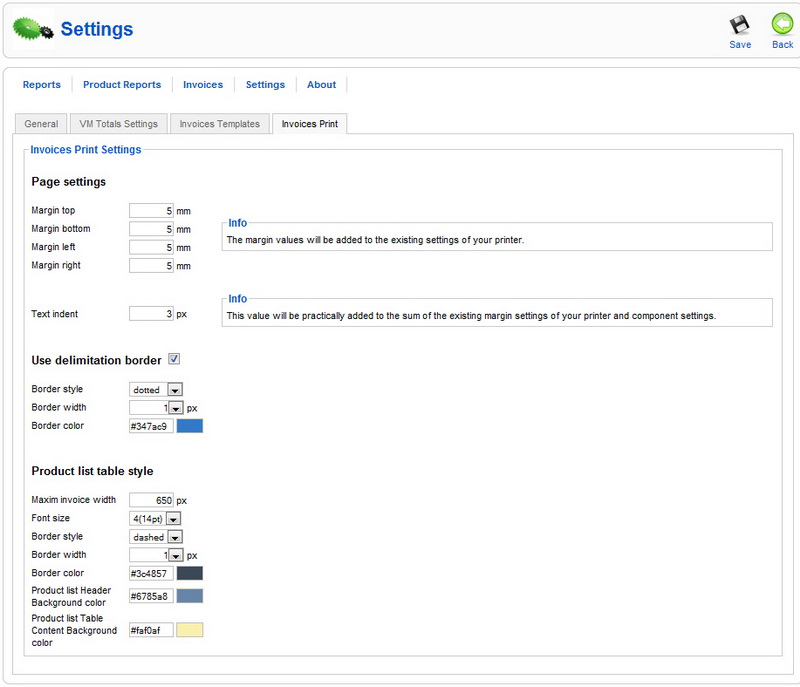
First under page settings the page margins can be configured. Attention here, since the entered values will be added to the existing settings of your printer.
A text indentation is also available, but also attention since this value will be practically added to the sum of the existing margin settings of your printer and component settings.
A delimitation border can be configured also if needed (style, width, color).
Then the administrator can configure the list of product, item which cannot be configured in the previous section (invoices templates).
The following configurations are available for the product list:
- Maxim invoice width
- Font size
- Border style
- Border width
- Border color
- Product list Header Background color
- Product list Table Content Background color
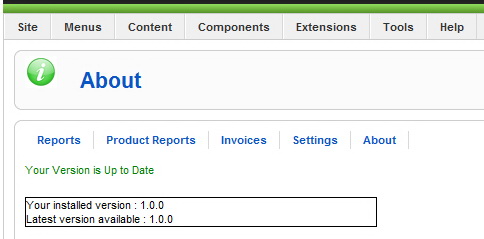
5. "About extension" displays the version information.
Requirements:
- Joomla 1.5.x
- VirtueMart 1.1.x
What is a theme?
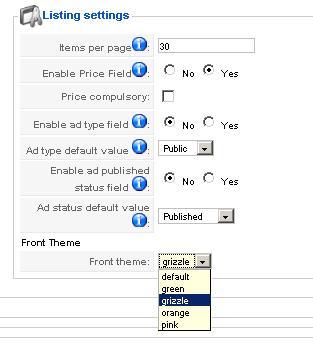
The templates can be found in the templates directory of the component. There you can find necessary folders as cache/ and default/ which are component required. In this location custom themes can be created and placed. This feature is introduced starting with version Ads Factory 1.5.5 and following themes are installed: 'green', 'grizzle', 'orange' and 'pink', so at a default installation the templates directory has the following list:
- templates/
- /cache/ - Smarty cache folder
- /default/ - component default templates
- /green/ - custom theme
- /grizzle/ - custom theme
- /orange/ - custom theme
- /pink/ - custom theme
Themes are variations from the default theme. If other then default theme is chosen as active, then there will be displayed the theme from /templates/chosen_theme/.
If a certain template is not present in the custom theme folder, then the default one will be displayed.
In order to update much easier, we recommend that you note all the changes made on the themes, then apply them on each update in order to avoid any issues!
For instance a certain need for customization is just to modify the t_listadds.tpl and the t_details_add.tpl templates.
Therefore a new theme folder should look like:
templates/new_theme/
- t_listadds.tpl
- t_details_add.tpl
How to create a new theme?
1. Create a new directory in /templates/
For instance, we want to create a theme that we choose a name for 'example'.
We create the folder 'example' in the templates/folder.
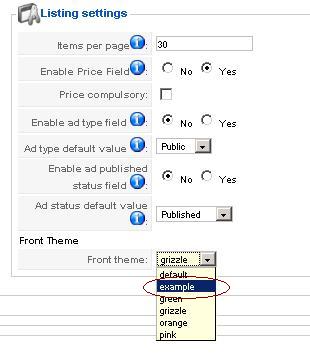
2. Create a new template.
Let's say we will need a custom t_listadds.tpl for this theme. We either create a blank template with the name above in the theme folder and start introducing smarties in it or we copy the default (or an existing t_listadds.tpl template ) and start customizing around it.
Hitting refresh on the listing page after altering the templates/example/t_listadds.tpl should make visible the changes.
Theme's Custom CSS File.
Theme CSS declarations can be included in a css file which if named "adsman.css" in the theme folder will be found and included in the page only by including {set_css} smarty tag in the template.
Positions / Templates Manager.
Positions Manager allows that templates available for automatic custom fields display (in Ads Factory 1.5.5 - t_details_add.tpl, t_listadds.tpl and t_userdetails.tpl) can be edited in a backend interface.
By editing the t_listadds.tpl template in the Positions/Templates Manager you actually will edit the selected as active theme. So this can become an instrument for editing these themes templates that you are interested of customizing.
Revised "Ads Factory" version 1.5.5.


