Installation - Configuration - Payments - Modules - Plugins - Uninstalling
Installation
Go to the backend Menu in Joomla, Extensions > Install/Uninstall.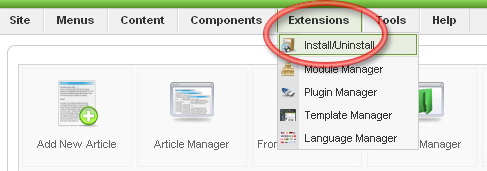
Click “Chose File” and “Open” the Ads Factory archive.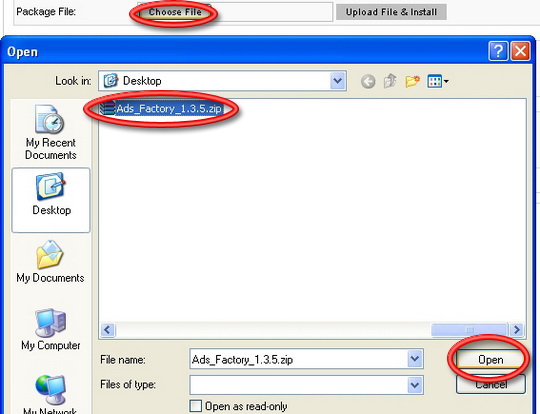
Click “Upload File & Install”
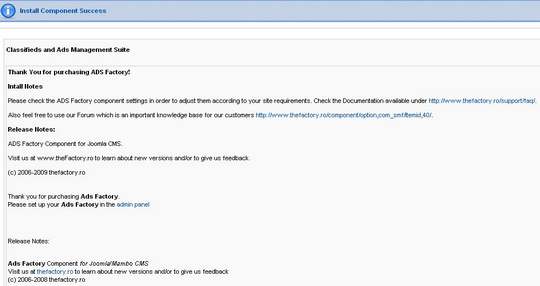
Configuration
Although Ads Factory is installed with default settings allowing it to be up and running almost instantly, it still needs some certain settings in order to be used at it’s full potential.
To access the Ads Factory backend options go to: Components > Ads Factory.
All the Ads Factory menus will be displayed in a list, you can select one from here, or just click on Ads Factory to display a line view that allows you to browse through the menus easier.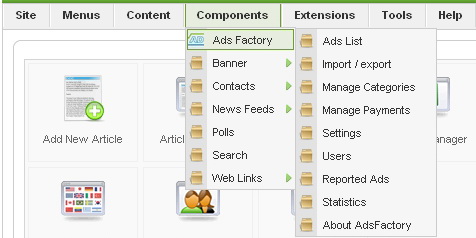

Ads List
You have full control over any Ad from here, changing category, price and the ability to block unwanted ads.
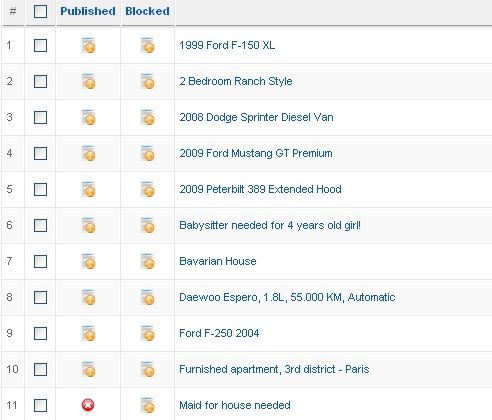
In the lower section of the page the display options are found, number of ads per page and page number. If you select to view all the ads, the page browser will disappear.

To Open/Block or Publish/Unpublish a single ad, click on the “Tile” for the respective column.
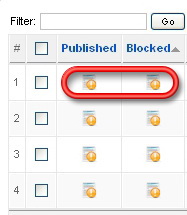
You can block more then one ad by checking the boxes next to the desired ads and clicking on the Block/Unblock buttons in the upper right of the Backend Menu.

This method of blocking ads is recommended for ads with a bad title, or if they advertise something you do not want on your website, if you want to check the contend of an ad click on it
to access the edit menu. In the upper right corner you will see the Block button.

Blocked ads will appear with  instead of
  .
.
Clicking on a specific Ad will open the Edit menu.
In the left you can see the ad itself and on the right you will find the user details and messages along with the period of time the ad will remain published.
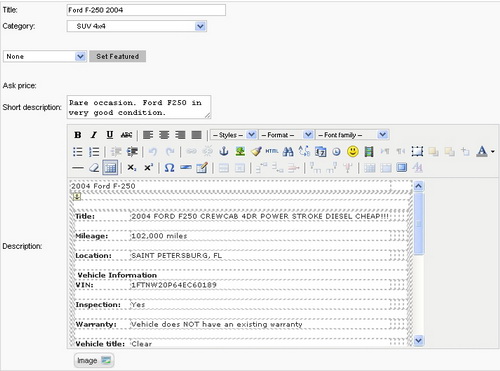
To Feature an ad Select the type: Gold, Silver or Bronze and click on “Set Featured” , press save in the upper right of the screen.

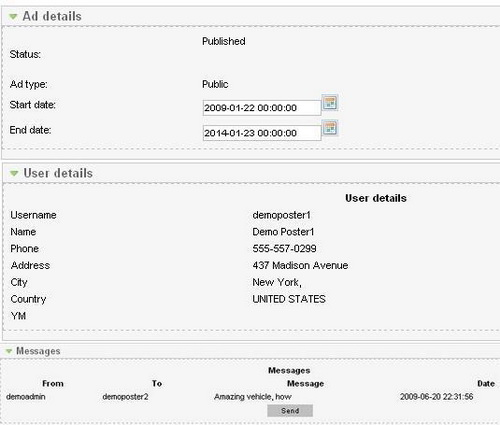
If you want to modify the Start or End date for an ad click on  from Ad details and a calendar will appear, locate the date you want and simply click on it.
Some ads will be set to publish at a later date then when they where created.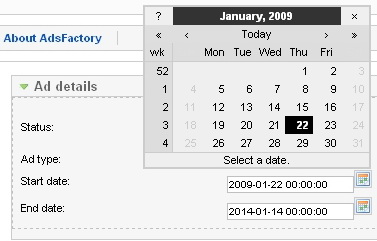
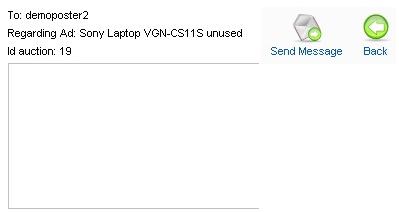
You can send a message to the poster by clicking on send, write your message then click on Send Message.This message will show on the frontend in the message board of the ad.
Whenever a user receives a message he will be announced via mail automatically, if enabled from Mail Settings.
Import /Export
The “Import ads” function allows you to upload CSV Files and Picture archives.
The “Export xls” function will create a Microsoft Excel Worksheet with information about the ads in your database.

Manage Categories
Creating the categories, with their sub-categories can be done here.
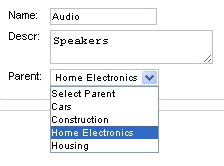
For a New Category press New Category and write the name you wish, then check the box next to it and press “Edit Categories” in the upper right, now you can assign it to a “Parent”, a category that comprises other small ones and add a small description.
e.g. Entertainment: Music, Sports, etc.
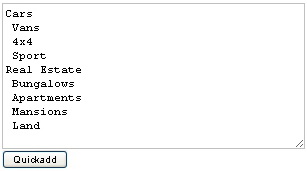
The Quick Add option allows you to add more categories along with their sub categories at once, they have to be written in a certain way to be properly arranged: Write the main category first, on the next line leave one space and write a sub category, under it you can write another and so on. If you want to add another main category do not leave a space in front of it and then continue as you did with the others.
Settings
General settings
Image settings
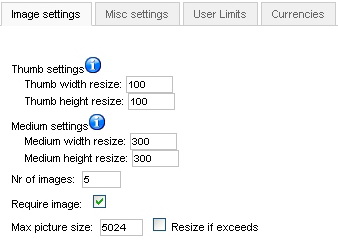
Picture settings for the ads can be found here, resolution, number of images and maximum size.
Thumbnail image is the small picture that is shown by every ad in the Ads List section.
“Require image” if marked will oblige the user to add at least one in order to post his Ad.
Miscellaneous settings
Various settings can be made here, you can fine tune the ads in the way that will best suit your needs.
You have the date and time format settings, these are the ones shown on every ad posted on your website “d” stand for Day, “m” for Month and “Y” for year. “H:i” is for a 24 hour representation of time and “h:iA” is for a 12 hour.
Enabling countdown will show the remaining time of the ad before it will expire.
Tags are an excellent way for ads to be filtered in a search, however if a user puts to many tag words his ad will pop up in every search, some people may find this annoying. To ensure this does not happen you should leave a decent limit on your tags, make the poster choose only the tags that are suited for his ad.
Price compulsory will require the poster to say the price he is asking for the product/service.
Map in ad details page will display the GoogleMap in the details section of the ads.
Captcha is used to prevent spamming, it requires the user to enter certain letters or numbers that a computer can not read, thus preventing automated spam messages.
The Captcha will prompt to guest users when they want to send messages.

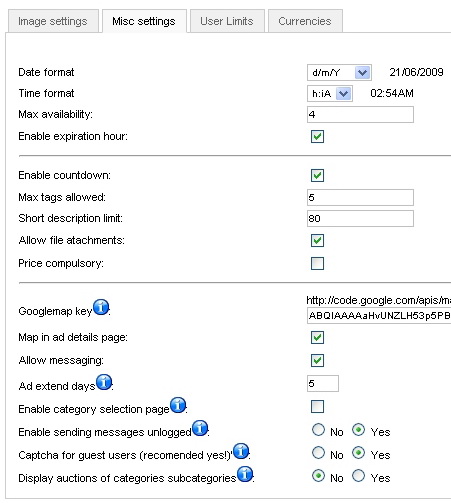
For a googlemap key you will need to go to http://code.google.com/apis/maps/ and they will guide you from there.
User Limits
You can set a limit of Ads per user or group of users, select the User/Group and type the maximum number you want for the User/Group in the specific field, then press “Save”
To delete the limit, Click on “x Delete” User/Group # in the left of the screen.
For unlimited ads set “Global User Limit” to 0

Currencies
The currencies that can be used for ad prices.
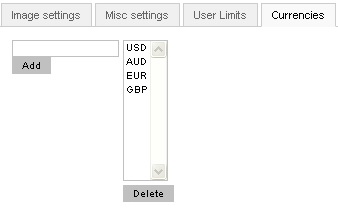
You can add new ones or delete them, just remember to press “Save” in the upper right corner.
CB integration
CB or Community Builder needs to be installed before the Ads component, if installed after you will be required to install the Ads plugins manually.
Mail Settings
The mail templates can be set up here, when an ad will soon expire or a user has been blocked, an email will be automatically sent to the user with the respective message. You can disable certain messages by selecting them, unmarking the “Enabled” box and pressing “Save”.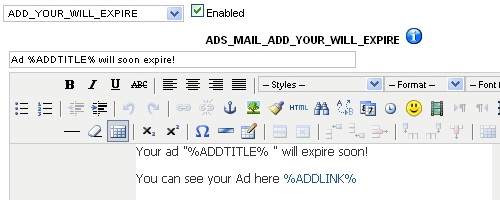
Terms and conditions
When a user creates an ad, he must agree to the Terms and Conditions, such as: Privacy, Confidentiality, Limitations or Payment method.
However if you leave it empty it will no longer be needed to agree.
Users
Here you can see the number of Ads posted by every user, the dates they where added on, and
personal information. Blocking/Unblocking users can also be done here, same way you block ads.

Reported Ads
Some people may try to make illegal sells or scam others, Reported Ads end up here and you can take a look at them to decide the best solution. A message can also be sent to the poster in order to announce him about the issue.

Statistics & About
These are information sections where you can view user numbers, ads posted and details about Ads Factory version and homepage.


Ads Man Menu Module
This is the primary module for Ads Factory.
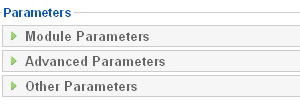
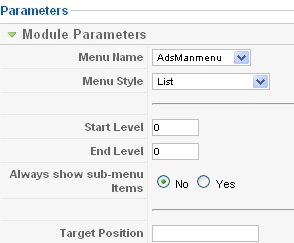
Module Parameters:
Menu Name:Adsmanmenu should be always selected
Menu Style: The way the Adsman menu appears, vertical or horizontal for example.
Start and End Level should be left 0 by default.
Always show sub-menu items: No by default, Yes if you want to display, although AdsMan does not have any
Target Position: Popup window position, 4 coordinates must be entered, top, left, width and height.
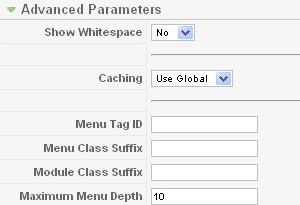
Advanced Parameters: Caching, Class Suffixes and Menu Depth are set here.
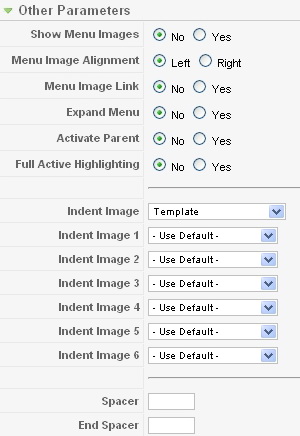
Other Parameters: Mostly Image settings and advanced module Details are found here.
Payments
To access the Payment methods Config go to Components>Ads Factory>Manage Payments
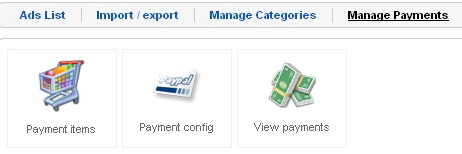
Payment items:you can cash in money by 3 methods
- per Listing
- per Contact
- per Featured
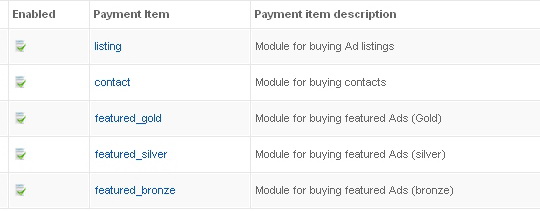
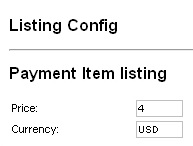
Clicking on an item opens the config screen where you can set the price and currency.
Payment config:Methods of payment are displayed here:
- Moneybrookers
- PayPal
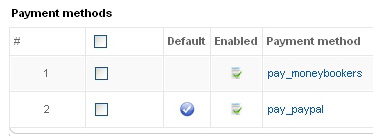
Clicking on them will open the e-mail screen,you will be required to enter you Paypal/Moneybrookers e-mail.

View payments: all payments are shown here along with their information.

User Payments
To get an Ad featured, click on one of the three options in the View Ad screen:

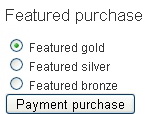
Select a Featured option

Select the method of payment

Now the Moneybrookers/Paypal server will take over the transaction.
Modules
These are the Modules that come installed automatically with Ads Factory.
You can see all the AdsMan modules by selectic the “mod_adsman” type in the Module Manager screen, this can be accessed in the Extension Pannel.


This is located in the right of the screen above the module list.
Now you can see the Module list for the Ads Factory Component.
Clicking on any of the modules will open a control pannel where you can set the position, title, access level (Public,Registerd,Special) and the location of the Module on your website.
To enable or disable a plugin, mark the box next to it and click Enable/Disable in the upper right.

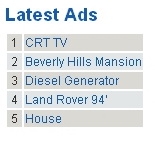
Latest Ads: Shows the last ads posted by users.
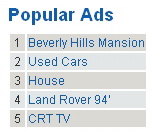
Popular Ads: Shows the most viewed ads.
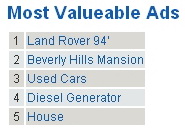
Most Valuable Ads: Shows the ads with the highest price.
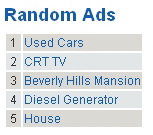
Random Ads: Shows random ads on your site.
Featured Ads: These are the paid ads, Only Gold,Silver or Bronze ads are shown here.

Configuring Latest, Popular, Most Valuable, Random and Featured Ads modules: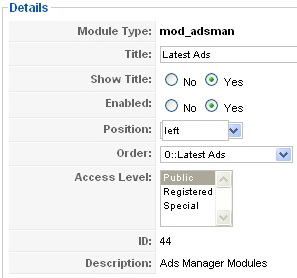
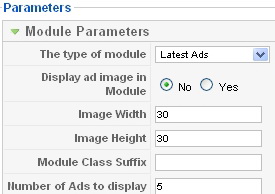
This is the standard Module edit menu for the 5 ads. You can set the title and wether or not to show it, the position of it on your site: left or right and the order it appears with the other menus on that side of your website. Access Level reffers to what kind of users can see it, Public can be seen by all, including guests, Registered is for users with an account and Special is for authors or higher access users.
In the Module Parameter menu you can chose if the module will show a small thumbnail image of the ads and it’s resolution.You can also select the number of Ads the Module can display.
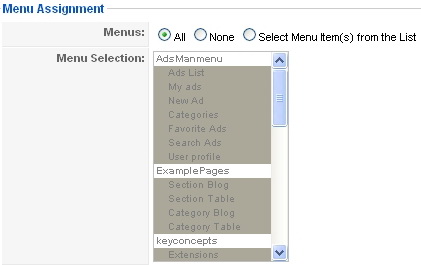
Menu Assignment is the same for all Modules, All means the Module will show in every section of the website you are in, if you wish to select specific areas of the site mark Select Menu Item and chose one.
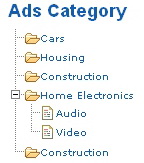
Ads Category: All the categories along with their sub-categories are shown here.
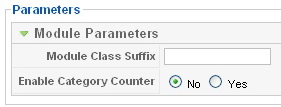
Module Class Suffix allows you to modify the CSS part of the module for individual styling, like: font, color and backround.
Category counter will display the number of ads in each category if enabled.
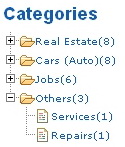
Categories section with Counter enabled.
Tag Clouds: Key words used by posters in their ads to make finding ads easier.
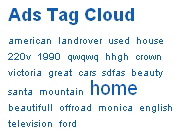
You can set the maximum tags to display, at first you might not have enough ads to fill the maximum number, when you get more Ads tag words will be randomly selected.

For Caching you can use the Global one or none at all, the Cache or Refresh time is set in minutes.

Plugins
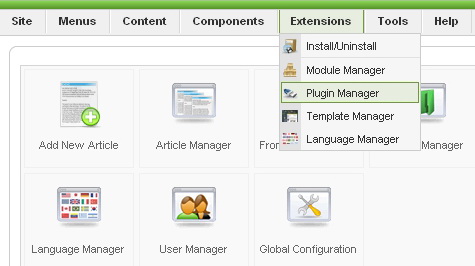
Ads Factory has the Pricing and Payment plugins automatically installed along with the GoogleMap plugin.To access the plugin manager screen go to Extension>Pluging Manager
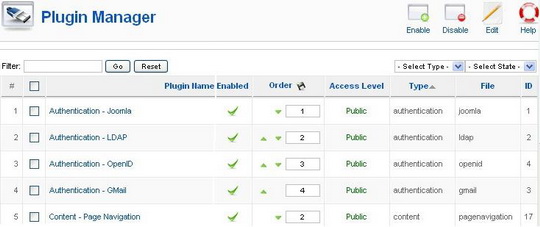
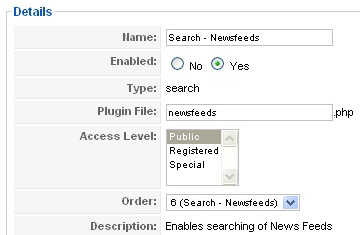
Plugins all have the same details but with different Parameters.
Uninstalling
To uninstall go to Extensions > Install/Uninstall > Components
Mark AdsMan and click Uninstall in the upper right corner.


Revised "Ads Factory" version 1.3.5.
Quick & Dirty Templating Tutorial for Love Factory
Love Factory includes a very powerful templating engine - Smarty. We will try to cover in this tutorial the essentials of building a template for Love Factory using this Template Engine. By far this can not cover the extensive manual of Smarty. Making use of Smarty, the Love Factory engine will provide to this engine some pre-filled objects and arrays of objects that are relevant to the current page displayed. We advice against writing hard coded text into the Templates, since this would render the multi language concept useless. If you do not care about the ability to translate your site, then you can do as needed.
This tutorial is addressed to the HTML savvy webmaster that need to change the default appearance of Joomla's Love Factory Component. For most customers the default template should be sufficient accommodating.
First of all what is a template engine. A (web) template engine is software that is designed to process web templates and content information to produce output web documents. It runs in the context of a template system. It is practically a php script that interprets some kind of pseudo HTML pages containing placeholders for specific variable content.
In order to update much easier, we recommend that you note all the changes made on the templates, then apply them on each update in order to avoid any issues!
1. Before we start...
First of all you must enable the use of Smarty Templates. This can be done by checking the "Use Smarty Templates" option in the admin backend (Settings -> General tab). Here you will find the full path to the templates. Usually the location is: [Joomla Location]/components/com_lovefactory/smarty/templates
2. Where are the files and what can be changed?
As mentioned before, the folder containing the templates is [Joomla Location]/components/com_lovefactory/smarty/templates. The components/com_lovefactory/templates/cache folder contains the pre-processed files and normally you should not have to edit or delete something in it. We recommand that this folder has writing rights for PHP scripts, so the engine can improve the speed by caching the templates.
- blacklist/view.tpl - Contains the template for displaying the Blacklisted (or Ignored) users
- friends/view.tpl - Contains the template for displaying the Friends list
- friends/pending.tpl - Contains the template for displaying the Pending Friendship Request list
- interactions/view.tpl - Contains the template for displaying the received Interactions list
- mailbox/error.tpl - Contains the template for displaying an error in case the Messaging System is disabled in the admin, but the user still tries to access it
- mailbox/inbox.tpl - Contains the template for displaying the list of all the received messages
- mailbox/outbox.tpl - Contains the template for displaying the of all the sent messages
- mailbox/read.tpl - Contains the template for displaying a received or sent message
- mailbox/write.tpl - Contains the template for displaying the form for writing a new message
- mailbox/_menu.tpl - Contains the template for displaying the Mailbox menu
- memberships/buy.tpl - Contains the template for displaying a list with all the memberships
- memberships/cancel.tpl - Contains the template for displaying a message when the users cancels a payment
- memberships/comparison.tpl - Contains the template for displaying a comparison list between all the memberships
- memberships/complete.tpl - Contains the template for displaying a message when a user completes a successful payment
- memberships/confirm_moneybookers.tpl - Contains the template for displaying a confirmation message when using Moneybookers
- memberships/confirm_paypal.tpl - Contains the template for displaying a confirmation message when using Paypal
- memberships/error.tpl - Contains the template for displaying an error message, if one occurs
- profile/banned.tpl - Contains the template for displaying a message if the user has been banned
- profile/edit.tpl - Contains the template for displaying the edit profile page
- profile/error_guest.tpl - Contains the template for displaying an error if a guest tries to accees a page available only for the registered users
- profile/error_registered.tpl - Contains the template for displaying an error if a registered user tries to register again
- profile/signup.tpl - Contains the template for displaying the registration form
- profile/view.tpl - Contains the template for displaying the user profile page
- profile/view_friends.tpl - Contains the template for displaying a message if a non-friend user is trying to access a profile available only for friends
- profile/view_offline.tpl - Contains the template for displaying a message if a user tries to access a offline profile
- profile/_comments.tpl - Contains the template for displaying the comments on the profile page
- search/advanced.tpl - Contains the template for displaying the form for an advanced search
- search/online.tpl - Contains the template for displaying the online users
- search/quick.tpl - Contains the template for displaying the form for a quick search
- search/_list.tpl - Contains the template for displaying the results from the "search/advanced.tpl", "search/online.tpl" and "search/quick.tpl" templates
- search/_sort.tpl - Contains the template for displaying the sort options for the "search/advanced.tpl" and "search/quick.tpl" templates
- terms/default.tpl - Contains the template for displaying the Terms and Conditions
All smarty templates are pure HTML. What the template engine needs to interpret must be put in accolades { }, a so called smarty tag. If the smarty contains a variable or a constant, then smarty just replaces it with its value. for instance this tag {$Itemid} will be replaced with the current joomla Itemid (for instance with "56" - without the quotation marks).
Smarty also allows IF clauses, so you can branch out two different displays depending on a condition. So for example {if $message eq ''}The message is empty{else}The message is NOT empty{/if} will display one of the two texts depending on the current message. Another useful smarty command is {include file='xxxxx'} - this includes another smarty template file.
4. Custom defined smarty functions for Love Factory.
Since Smarty is a very powerful tool for templating, we can create custom functions that can be called out from templates. Functions that are not in the standard distribution of smarty. We created following functions that can be used especially for our purpose.
* {jroute route='index.php?option=com_lovefactory&view=friends&layout=view&Itemid=%Itemid%&id=%id%' Itemid=56 id=9} - creates a Joomla page link using the routing system.
* {jtext _='Some text to be translated'} - translates the text using Joomla's translation system.
4. Variables that are ALWAYS initialized.
* {$Itemid} - The menu Itemid
5. Variables initialized in specific pages.
5.1. Variables initialized in blacklist/view.tpl
* $count - total number of users on the Blacklist (or Ignore list)
* $blacklist - array containing all the users on the Blacklist. Each element of the array has the properties: sender_id (the user that blacklisted), username (the username of the blacklisted user), date (the date when it happened), id (the id from the database of the current blacklist entry).
* $pagination - Joomla pagination object containing the pagination links. To access the links you must use the method getPagesLinks() on the pagination object (eg: $pagination->getPagesLinks())
5.2.1. Variables initialized in friends/view.tpl
* $layout - contains the current layout, it's required for the menu, to highlight the current layout
* $friends - array containing all the friends
* $pagination - same as blacklist/view.tpl
5.2.2. Variables initialized in friends/pending.tpl
* $layout - contains the current layout, it's required for the menu, to highlight the current layout
* $friends - array containing all the pending requests
* $pagination - same as blacklist/view.tpl
5.3. Variables initialized in interactions/view.tpl
* $interactions - array containing all the interactions
* $pagination - same as blacklist/view.tpl
5.4.1. Variables initialized in mailbox/inbox.tpl
* $messages - array containing all the received messages
* $pagination - same as blacklist/view.tpl
5.4.2. Variables initialized in mailbox/outbox.tpl
* $messages - array containing all the sent messages
* $pagination - same as blacklist/view.tpl
5.4.3. Variables initialized in mailbox/read.tpl
* $message - the messege being read. Has the following properties: isSent(), isReceived() - checks if the message was sent or received; getReceiverName(), getSenderName() - retrieves the receiver name or the sender name; date - the date when it was sent; title - the title; text - the text; isSystemMessage() - checks if the message was sent automatically by the system; reported - checks if the message has been reported
* $blacklisted - the blacklist status of the sender/receiver
5.4.4. Variables initialized in mailbox/write.tpl
* $message - containes the messages being replyed to in case the user writes a reply
5.5. Variables initialized in memberships/buy.tpl
* $prices - array containing all the published membership prices set in backend
5.6.1. Variables initialized in profile/edit.tpl
* $page->description - description about the current page, set in backend
* $zones - array containing the zones and fields for the edit page
* $settings - array containing all the settings set in backend
* $profile - array containg all the information about the current profile
5.6.2. Variables initialized in profile/signup.tpl
* $page->description - description about the current page, set in backend
* $zones - array containing the zones and fields for the signup page
* $settings - array containing all the settings set in backend
5.6.3. Variables initialized in profile/view.tpl
* $page->description - description about the current page, set in backend
* $zones - array containing the zones and fields for the view page
* $settings - array containing all the settings set in backend
* $profile - array contain all the information about the current profile
* $my_profile - checks if the profile belongs to the current user
* $friend - information about the friendship status between the users, if the profile doesn't belong to the current user
* $blacklisted - information about the blacklist status between the users, if the profile doesn't belong to the current user
* $friends - array contain the latest friends of the user
5.6.4. Variables initialized in profile/_comments.tpl
* $comments - array containing the comments
* $pagination - same as blacklist/view.tpl
* $user - information about the current user
* $id - the user id of the current profile
5.7.1. Variables initialized in search/advanced.tpl
* $page->description - description about the current page, set in backend
* $zones - array containing the zones and fields for the advanced search page
5.7.2. Variables initialized in search/quick.tpl
* $page->description - description about the current page, set in backend
* $zones - array containing the zones and fields for the quick search page
5.7.3. Variables initialized in search/_list.tpl
* $results - array of users matching the current search
* $profile_zones - array containing the zones and fields for the profile search
* $pagination - same as blacklist/view.tpl
5.8. Variables initialized in terms/default.tpl
* $terms - containes the text for the terms and conditions
6. Final advices and considerations.
Before starting to work on the templates take a look at the provided ones, and try to understand how they are done. Leave all hidden inputs as they are. If unsure better ask in our forums. Remove the inputs from the template only if sure what you do. you can put them where you like on the page, but if you what to remove one better ask.
Test if your changes generate JS errors. These could alter the behavior of the pages.
MOST IMPORTANT OF ALL: do not hesitate to search and to ask! The forums are a great place to share information.
The auction buying (at the end of the auction - when bid is accepted) is evidently done by the winner. The auctioneer must have a paypal address saved in profile as the payment must have a destination. This way a winner user must see the paypal link in the auction details page with the amount bidded (plus shipment) to the auctioneer email.
In this example the auction has a shipment price of 50 USD and the winning bid is of 200USD:
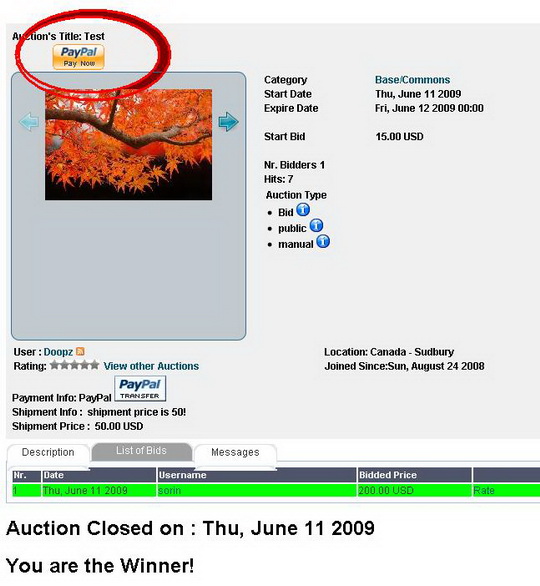
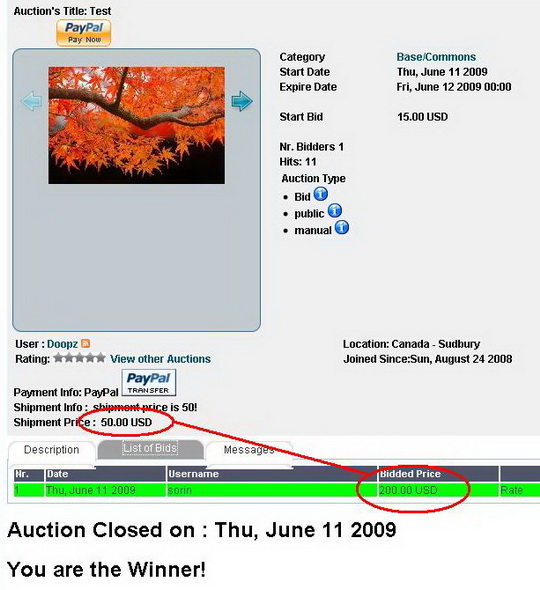
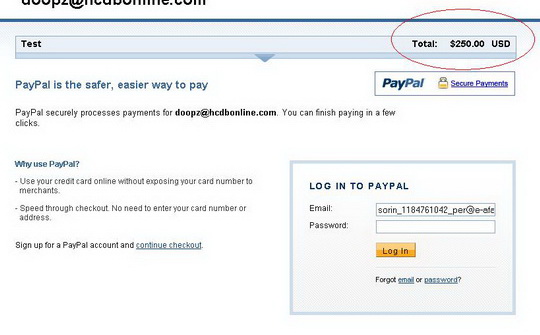
Therefore the final amount to pay is 250:
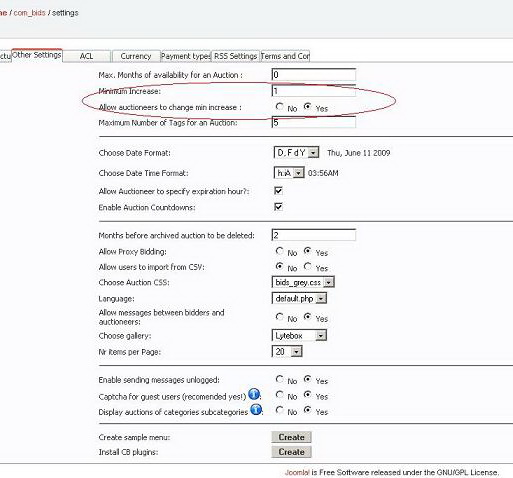
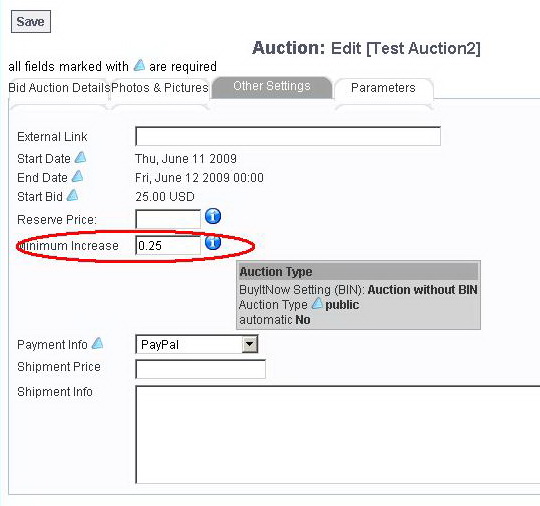
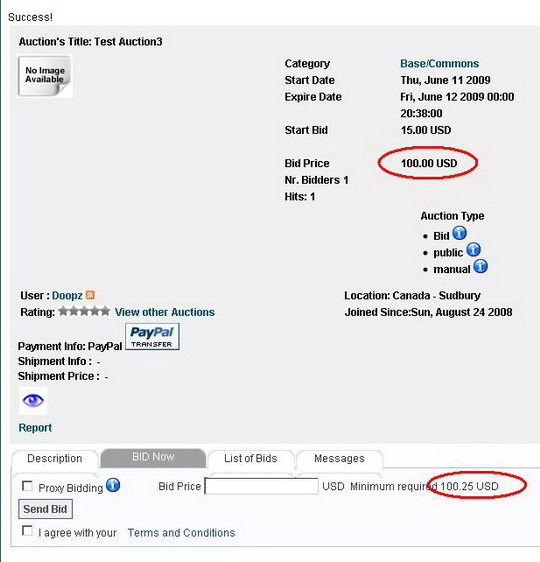
Minimum increase can be set up from backend: default value and enable/disable the option of auctioneers setting up a different increase amount. The default number format is xxx.yy (. as separator and 2 decimals). The 2 decimals are recomended to keep as payment processors usually don't accept more decimals! As for the separators (decimal, thounds) depends on your server locale but can be changed in display using the number_format as modifier for smarty ({$dummy_amount|number_format:"3":".":" "} instead of string_format) and in programming using the number_format PHP method.
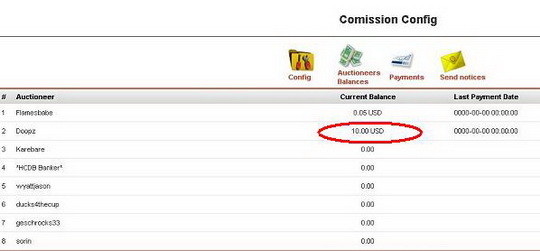
Commission is tax you apply to a finished auction with winner (after bid acceptance). There can be various commissions to powersellers or verified users. The auctioneer "Doopz" has the 5% commission set. For a 200.00 USD winning bid the user "Doopz" is taxed 10USD (the 5% from 200). For another winned auction with the bid of 100USD he has to pay another 5USD. The total amount of commission sums to 15USD.
Best watched full screen!
Quick & Dirty Templating Tutorial for Raffle Factory.
Raffle Factory includes a very powerful templating engine - smarty. We will try to cover in this tutorial the essentials of building a template for Raffle Factory using this Template Engine. By far this can not cover the extensive manual of smarty. Making use of smarty, the auction engine will provide to this engine some pre-filled objects and arrays of objects that are relevant to the current page displayed. Also all language constants defined in Raffle Factory can be accessed in the template. We advice against writing hard coded text into the Templates, since this would render the multi language concept useless. If you do not care about the ability to translate your site, then you can do as needed.
This tutorial is addressed to the HTML savvy webmaster that need to change the default appearance of Joomla's Raffle Factory Component. For most customers the default template should be sufficient accommodating.
First of all what is a template engine. A (web) template engine is software that is designed to process web templates and content information to produce output web documents. It runs in the context of a template system. It is practically a php script that interprets some kind of pseudo HTML pages containing placeholders for specific variable content. In our case most are auction related.
In order to update much easier, we recommend that you note all the changes made on the templates, then apply them on each update in order to avoid any issues!
1. Where are the files and what can be changed?
All template files are in the components/com_bids/templates folder.
The components/com_bids/templates/cache folder contains the pre-processed files and normally you should not have to edit or delete something in it. We recommend that this folder has writing rights for PHP scripts, so the engine can improve the speed by caching the templates.
raffle/t_auctiondetails.tpl - Contains the template for displaying the Raffle Item details page
t_auctiondetails_plugins.tpl - Contains the code snipplet that enables "Listing Upgrade" to Gold, Silver, Bronze
t_categories.tpl - Display of Categories page (Category Directory)
raffle/t_editauction.tpl - is used to display the page for "New Raffle" and "Edit Raffle". The $task smarty variable contains the current task (newauction or editauction)
t_featured_purchase.tpl - display of available Pricing and Fees
t_header_filter.tpl - Displays a message div with the current active filters
t_javascript_language.tpl - Javascript birdge for language strings. Should not be modified in most cases and should be included in most templates
t_listauctions.tpl - The base template for raffle listing. Here are the listing elements being rendered. Most of the output is done in the corresponding *_cell.tpl
raffle/t_listauctions_cell.tpl - The Raffle listing cell. this is the cell for one raffle. The cycling is done in t_listauctions.tpl
t_listfooter.tpl - Listing footer (pagination links).
t_myauctions.tpl - similar to listauctions, only for "My raffles"
raffle/t_myauctions_cell.tpl - similar to listauctions_cell, only for "My raffles"
t_mybids.tpl - similar to listauctions, only for "My Bids"
raffle/t_mybids_cell.tpl - similar to listauctions_cell, only for "My Bids"
t_mywatchlist.tpl - similar to listauctions, only for "My watchlist"
raffle/t_mywatchlist_cell.tpl - similar to listauctions_cell, only for "My watchlist"
t_mywonbids.tpl - similar to listauctions, only for "My won bids"
raffle/t_mywonbids_cell.tpl - similar to listauctions_cell, only for "My won bids"
t_overlib.tpl - JS for overlib. Should be included if overlib is used
t_payment_cancel.tpl - Returning page from Paypal if the payment was canceled
t_payment_return.tpl - Returning page from Paypal on successful payment (can be overridden in the payment plugin)
t_search.tpl - Template for the search page
t_showSearchResults.tpl - Template for the Search Results
t_tags.tpl - Template for the Tags selection
2. Basic smarty knowledge.
All smarty templates are pure HTML. What the template engine needs to interpret must be put in accolades { }, a so called smarty tag. If the smarty contains a variable or a constant, then smarty just replaces it with its value. for instance this tag {$task} will be replaced with the current joomla task (for instance with "newauctions" - without the quotation marks).
Smarty also allows IF clauses, so you an branch out two different displays depending on a condition. So for example {if $task=='newauctions'}You are creating a new auctions{else}You are editing an existing auction{/if} will display one of the two texts depending on the current task. Another useful smarty command is {include file='xxxxx'} - this includes another smarty template file. For instance it it useful for us in the matter of including the necessary javascript for the auctions. Since most pages use the same javascript codebase we can have just a single page containing these statements. For assigning a value to a variable (if the variable does not exist, it will be created) you have to use {assign var=variablename value='VALUE'} in this way you may use smarty for advanced templating techniques that resembles more with programming.
3. Custom defined smarty functions for RAFFLE FACTORY.
Since Smarty is a very powerful tool for templating, we can create custom functions that can be called out from templates. Functions that are not in the standard distribution of smarty. We created following functions that can be used especially for our purpose (Raffle).
* {set_css} - prints out the Raffle CSS
* {infobullet text="some info text"} - creates a standard joomla help bullet (requires overlib to be initalized first)
* {printdate date=$some_date_variable use_hour=0} - prints out the date variable according to the datetime format chosen in admin backend (use_hour=0 - ignores hours, use_hour=1 prints also the time)
* {createtab} - initalizes the Tabbed output (joomla standard)
* {startpane id="content-pane" usecookies=0} - starts the Tabbed pane (the container that holds all tab pages). the usecookies setting can be set to 1, leading to the tabbed display to remember what particular tab was last time active when you visited that page
* {endpane} - ends a previously started tabbed pane
* {starttab paneid="content-pane" text="Tab caption"} - Starts a new TAB in the pane with the id "content-pane" (you must use the id from the startpane call)
* {endtab} - Ends a TAB
4. Variables that are ALWAYS initialized by the raffle system.
* {$mosConfig_live_site} - the url of the site. as defined in Joomla Configuration
* {$Itemid} - The menu Itemid
* {$task} - the current task
* {$option} - the current option (should always be com_bids)
* {$is_logged_in} - true if the user is logged in. false if not
* {$userid} - the joomla user id. if not logged in it will be null or 0
All Language constants and configuration constants are accesible in the template; all are in the form {$smarty.const.xxxx} where xxxx is the contant name. For instance for the constant string defined as "bid_auction_number" you have to use {$smarty.const.bid_auction_number}. All saved options are the following:
* bid_opt_max_picture_size - max image size in kb
* bid_opt_date_format - Date format string (PHP style)
* bid_opt_date_time_format - Hour format string (PHP style)
* bid_opt_thumb_width - Thumbnail width
* bid_opt_thumb_height - Thumbnail height
* bid_opt_medium_width - Raffle Detail page image width
* bid_opt_medium_height - Raffle Detail page image height
* bid_opt_availability - max months that an raffle can last
* bid_opt_maxnr_images - max nr of images allowed for an raffle
* bid_css - css file
* bid_opt_min_increase - bid increment
* bid_opt_allow_messages - True if messages are allowed between auctioneer and bidder
* bid_opt_allow_proxy - true if proxy bidding is enabled
* bid_opt_archive - max moths that auctions are kept in the database
* bid_opt_nr_items_per_page - pagination
* bid_opt_allow_import - allow bulk import by the users
* bid_opt_enable_hour - enable hour for auctions (if false then auctions expire on midnight)
* bid_opt_enable_countdown - enables the countdown in auctions listings
* bid_opt_language - language file
* bid_opt_RSS_title - RSS feed title
* bid_opt_RSS_description - RSS feed decription
* bid_opt_RSS_nritems - max items in RSS
* bid_opt_RSS_feedtype - RSS feed type
* bid_opt_enable_acl - true if the site uses ACL (Access Class lists ) - Bidder and Seller group
* bid_opt_acl_type - Acl type - groups or field
* bid_opt_acl_bidder - Bidder group
* bid_opt_acl_seller - Seller Group
* bid_opt_max_nr_tags - max tags allowed for an raffle
* bid_opt_allowpaypal - allow users to specify their paypal email in order to facilitate the funds transfer
* bid_opt_allow_nr_tickets - Allow nr of tickets at new raffle create
* bid_opt_require_nr_tickets - Require nr of tickets
* bid_opt_allow_end_date - Allow user to select an end date to a raffle
* bid_opt_require_end_date - Require the end date when a raffle is created
5. Raffle Variables initialized in specific pages.
5.1. Variables initialized in Raffle Details and Raffle listings.
For raffle detail the main object is called $auction, in auction listings the cell templates will hold a similar object called $current_row The properties of $auction and $current_row are similar. We will present them for $current_row. If you need them in Raffle details or in Raffle Edit/New you must replace "$current_row" with "$auction"
* $current_row->id // The Raffle ID - Needed for specific calls
* $current_row->userid // The Auctioneer USER-ID (Joomla native)
* $current_row->title // The Raffle TITLE
* $current_row->shortdescription // The Raffle Short description
* $current_row->description //The Raffle Description
* $current_row->picture // The raffle MAIN picture name (not the URL!)
* $current_row->link_extern //The external link (Settable by the auctioneer)
* $current_row->initial_price // The Raffle initial price - as an float. for formatting use {$auction->initial_price|string_format:"%.2f"}
* $current_row->currency // The Currency ID (Not the currency name!)
* $current_row->currency_name // Currency Name (Ex. USD)
* $current_row->auction_type //The Raffle Type public auctions =1, private auctions=2
* $current_row->automatic // If true, then the raffle is automatic
* $current_row->payment // Chosen payment type ID
* $current_row->payment_name // Payment Method Name
* $current_row->shipment_info // The Raffle shipment info
* $current_row->start_date //Start date of the Raffle in a datetime type (not formatted)
* $auction->start_date_text //Start date of the Raffle in a datetime type (formatted)
* $current_row->end_date //End date of the Raffle in a datetime type (Not formatted)
* $auction->start_date_text //End date of the Raffle in a datetime type (formatted)
* $current_row->closed_date //Closing date of the Raffle. To format use {printdate date=$auction->closed_date}
* $current_row->published // True if published. Just for MY Auctions
* $current_row->close_offer // True if Raffle is closed
* $current_row->close_by_admin //True if Raffle is BANNED - just for MY Raffle
* $current_row->hits // Nr of hits
* $current_row->featured //"gold","silver","bronze" or "none"
* $current_row->modified // Last edit time - not formatted, use printdate
* $current_row->newmessages// True if New messages are available for the current looged user in this auction
* $current_row->winner_id // Winner userid.
* $current_row->ticket_price // The price per ticket if any
* $current_row->i_am_winner // true if the current logged user is winner in this auction
* $current_row->winners // list of selected winners by stage reached
* $current_row->nr_bidders // Number of raffle buyers
* $current_row->nr_tickets_bought // Number of raffle tickets bought
* $current_row->nr_tickets_available // Number of tickets available
* $current_row->cat // Category id (NOT category name)
* $current_row->catname // Category Name (Ex. Automobiles)
* $current_row->auction_nr // AUN (Auction Unique Number)
* $current_row->username //auctioneer Username
* $current_row->verified_auctioneer //True if auctioneer is verified
* $current_row->rating_auctioneer // Rating as a seller for the auctioneer
* $current_row->rating_bidder // Rating as a bidder for the auctioneer
* $current_row->rating_overall // Overall auctioneer rating
* $current_row->auctioneer // object containing the auctioneer joomla user info
* $current_row->auctioneer_details // object containing Auction Factory relevant Auctioneer User info (city, country,..)
* $current_row->tags // Raffle related tags - use $current_row->links.tags to display links
* $current_row->rownr // Current number (for cells only)
* $current_row->nr_new_messages // Nr of new messages in this auctions message board for the current user
* $current_row->is_my_auction // True if the current logged user is also the auctioneer of the auction
* $current_row->del_from_watchlist //true if current raffle IS in the users watchlist
* $current_row->add_to_watchlist //true if current raffle IS NOT in the users watchlist
* $current_row->countdown //if show countdown is enabled contains the current countdown text (Ex: "2 days,2 hrs,10 min,2secs")
* $current_row->expired // True if the raffle is expired (the end date is passed)
* $current_row->thumbnail //countains the thumbnails html code.
* $current_row->links.otherauctions // contains the url to "Other auctions by this auctioneer"
* $current_row->links.bids // Contains the link to the current bids of the auction
* $current_row->links.edit // Contains the link to "Edit this auction"- just for my raffles
* $current_row->links.cancel //Contains the link to "Cancel this auction"- just for my raffles
* $current_row->links.publish //Contains the link to "Publish this auction"- just for my raffles
* $current_row->links.republish //Contains the link to "Republish this auction"- just for my raffles
* $current_row->links.filter_cat //Contains the link to the category filter for the auctions category
* $current_row->links.messages //Contains the link to the message list for the current raffle
* $current_row->links.add_to_watchlist //Contains the link that adds the current auction to the users watchlist
* $current_row->links.del_from_watchlist //Contains the link that removes the current raffle to the users watchlist
* $current_row->links.tags // contains the links for the tags of the current raffle
* $current_row->links.auctioneer_profile // contains the link to the auctioneer profile
5.2. Variables for search template.
* {$lists.cats} - category pick up list HTML code
* {$lists.country} - country pick up list HTML code
* {$lists.city} - city pick up list HTML code
* {$lists.users} - Users pick up list HTML code
5.3. Variables for Raffle details.
* {$auctioneer} - contains the object that defines the Joomla user
* {$auctioneer_details} - contains the object that defines the Auctioneer details (city, country, verified..)
* {$bid_list} - the list of tickets bought on this raffle
* {$message_list} - list of messages to the current user
* {$terms_and_conditions} - true if there are terms and conditions to accept
6. Final advices and considerations.
Before starting to work on the templates take a look at the provided ones, and try to understand how they are done. Leave all hidden inputs as they are. If unsure better ask in our forums. Remove the inputs from the template only if sure what you do. you can put them where you like on the page, but if you what to remove one better ask.
Test if your changes generate JS errors. These could alter the behavior of the pages.
There are virtually no security issues in changing the templates. The data that should not appear is also not initialized (lets say for a private raffle). But caution is always a good approach, so test first what kind of raffle or what kind of rights are currently active.
MOST IMPORTANT OF ALL: do not hesitate to search and to ask! The forums are a great place to share information.
Revised "Raffle Factory" version 1.0.x.