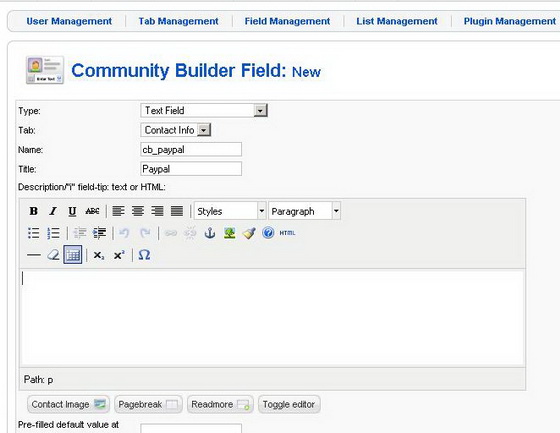
First we have a field to integrate. Create the CB field as any other. For example (see screenshot) the "Paypal" field.
This field will be filled in the Community Builder interface for user profile edit form.
Step 2 - Access CB Integration menu in component

Integration of Community Builder in Auction Component is done evidently from Auction Component administration.
Here go to the Auction Component "Settings" Menu where the Community Builder Integration option available is.
Step 3 - Integrate CB
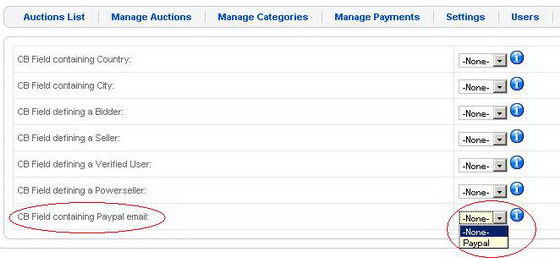
Assign the newly created "Paypal" field in CB to the Auction Component analogue field in the list of the available for integration.
This integration procedure is also available for the rest of the fields of the component.
For version 1.3.0 and up:
For this tutorial, let's say we want to add the "Paypal2" payment gateway.
1. Create a new file for the payment in [Joomla dir]/administrator/components/com_lovefactory/plugins/payment folder. We'll call it paypal2.php (only letters and numbers are allowed!)
2. Add the following php code to the file:
<?php
defined('_JEXEC') or die('Restricted access');
require_once(JPATH_COMPONENT_ADMINISTRATOR.DS.'plugins'.DS.'factoryPaymentPlugin.class.php');
class Paypal2 extends factoryPaymentPlugin
{
}
This creates a new payment class. Note that the name of the class must be the same as the file name (case insensitive).
Right now, if you go to the Backend -> Lovefactory -> Payments -> Payment gateways, you'll see that our payment gateway has appeared in the list. But it cannot be used, as it has not been configured and set up (if you click on it's name, "Configuration form not set up!" message will appear).
3. To configure the payment plugin, add the "configure" method to the class:
function configure()
{
parent::configure();
$this->description = 'Paypal2 Payment Tutorial';
$this->params = array('email');
$this->action = 'https://www.paypal.com/cgi-bin/webscr';
}
First we set the payment gateway description, an array of parameters (in our case the email) and the action (url) of the processing payment gateway.
4. To be able to change the parameters from the backend, we need to add the "showAdminConfig" method to the class:
function showAdminConfig()
{
?>
<table>
<tr>
<td><label for="email">Email:</label></td>
<td><input name="email" id="email" value="<?php echo $this->_params->get('email', 'This email address is being protected from spambots. You need JavaScript enabled to view it.'); ?>"></td>
</tr>
</table>
<?php
}
Note: to access the values of the parameters defined in the configure section, use the following: $this->_params->get('NAME OF THE PARAMETER', 'DEFAULT VALUE IF NOT SET');
The above code outputs an input box for the email parameter.Now if you go on the gateway plugin page, you'll be able to edit and save the parameters.
5. Go ahead and edit and save the parameters. Now you can publish the plugin by clicking on the icon from the Published column. Publish the plugin, and go to frontend -> Membership plans and click on any available plans. The new payment gateway has appeared in the list.
If you select now the new payment method and click on the Purchase button, an error will show up: "paypal2 does not have step 1". This is because we have not defined what the plugin is supposed to do. We do that in steps. You can have as many steps as you want, but only step1 is required.
For Paypal only one step is required. All you have to do is to show a confirmation form that the user submits to Paypal and that's it.
But other payment gateways may require some additional steps. For example, first you need the user to fill some billing information, and only then show the confirmation form.
6. Let's add step one to the class:
function step1()
{
$order = $this->createOrder();
?>
<h1>Confirm</h1>
<p>Are you sure you want to buy <b><?php echo $order->title; ?></b> using Paypal2?</p>
<br />
<form action="<?php echo $this->action; ?>" method="post">
<input type="hidden" name="item_number" value="<?php echo $order->id; ?>" />
<input type="hidden" name="on0" value="userid" />
<input type="hidden" name="os0" value="<?php echo $this->user->id; ?>" />
<input type="hidden" name="amount" value="<?php echo $order->amount; ?>" />
<input type="hidden" name="currency_code" value="<?php echo $order->currency; ?>" />
<input type="hidden" name="cmd" value="_xclick" />
<input type="hidden" name="business" value="<?php echo $this->_params->get('email', ''); ?>" />
<input type="hidden" name="item_name" value="<?php echo $order->title; ?>" />
<input type="hidden" name="quantity" value="1" />
<input type="hidden" name="return" value="<?php echo $this->return_url; ?>" />
<input type="hidden" name="cancel_return" value="<?php echo $this->cancel_return; ?>" />
<input type="hidden" name="notify_url" value="<?php echo $this->notify_url; ?>" />
<input type="hidden" name="tax" value="0" />
<input type="hidden" name="no_note" value="1" />
<input type="hidden" name="no_shipping" value="1" />
<input type="submit" value="Purchase" />
</form>
<?php
}
The first line creates and stores a new order in the database. You can access the following properties of the order, in case you need them:
- $order->id (the auto generated id of the order, numeric, eg: 10)
- $order->title (the auto generated title of the order, string, eg: 12 Months Advanced @ 100.00 EUR)
- $order->user_id (the Joomla user id of the current user)
- $order->membership_id (the id of the membership being ordered)
- $order->amount (the total amount of the order)
- $order->currency (the currency of the order)
- $order->months (the number of months of membership being ordered)
- $order->gateway (the gateway used)
In our example we need the the order id, amount, currency and title to send them to Paypal.
After that, the Paypal confirmation form is shown to the user. Other available variables:
- $this->action (this is the action defined in the configure function above)
- $this->user->id (the Joomla user id of the current user)
- $this->return_url (the url to return if the payment process was completed successfully)
- $this->cancel_return (the url to return if the payment process was not completed successfully or the user aborted the payment)
- $this->notify_url (the url used to notify LoveFactory if the payment was valid and successful or not)
7. Now select the paypal2 method and click on the Purchase button again. The confirmation form will show up. If the user clicks on the Purchase button, will be redirected to Paypal. If the payment is completed successfully, the user will be then redirected to $this->return_url or else to $this->cancel_return.
8. All it's left now to do, is create the method to handle the IPN from Paypal. Add the "processIpn" method to the class:
function processIpn()
{
// Get values from request
$this->refnumber = trim(stripslashes($_POST['txn_id']));
$this->order_title = trim(stripslashes($_POST['item_name']));
$this->order_id = trim(stripslashes($_POST['item_number']));
$this->status = trim(stripslashes($_POST['payment_status']));
$this->amount = trim(stripslashes($_POST['mc_gross']));
$this->currency = trim(stripslashes($_POST['mc_currency']));
$this->receiver_email = trim(stripslashes($_POST['receiver_email']));
$this->payer_email = trim(stripslashes($_POST['payer_email']));
$this->test_ipn = trim(stripslashes($_POST['test_ipn']));
$this->first_name = trim(stripslashes($_POST['first_name']));
$this->last_name = trim(stripslashes($_POST['last_name']));
$this->user_id = trim(stripslashes($_POST['option_selection1']));
$this->date = trim(stripslashes($_POST['payment_date']));
$payment = $this->getNewPayment();
$payment->payment_date = $this->date;
$payment->user_id = $this->user_id;
$payment->amount = $this->amount;
$payment->currency = $this->currency;
$payment->order_id = $this->order_id;
$payment->refnumber = $this->refnumber;
// Check for errors
$this->errors = $this->validatePayment();
switch ($this->status)
{
case 'Completed':
case 'Processed':
$payment->status = count($this->errors) ? 'manual-check' : 'ok';
break;
case 'Failed':
case 'Denied':
case 'Canceled-Reversal':
case 'Expired':
case 'Voided':
case 'Reversed':
case 'Refunded':
$payment->status = 'error';
break;
case 'In-Progress':
case 'Pending':
default:
$payment->status = 'manual-check';
break;
}
$this->savePayment($payment);
}
What this function does?
- retrieves the variables sent by Paypal
- creates a new payment object
- set the payment's required properties (payment_date, user_id, amount, currency, order_id, refnumber)
- checks if the payment has any errors (we'll create the validatePayment() function later)
- depending on the Paypal response and if any errors were found, we set the payment status: a.) ok: no errors found and a valid response from Paypal; b.) error: Paypal rejected the payment c.) manual-check: the payment is pending or in progress.
- we save the payment. Depending on the payment status, the membership will be automatically updated.
9. Validation functions:
function validatePayment()
{
$errors = array();
// Validate IPN
if (true !== $this->validateIpn())
{
$errors[] = JText::_('IPN not verified');
}
// Validate paypal email
if ($this->receiver_email != $this->_params->get('email', ''))
{
$errors[] = JText::_('Receiver email is different from expected');
}
// Validate user
if (!$this->validateUser())
{
$errors[] = JText::_('User doesn\'t exist or is not validated!');
}
// Validate Order
$order = $this->getOrder($this->order_id);
if ($order)
{
if ('pending' == $order->status)
{
// Validate amount
if ($order->amount != $this->amount)
{
$errors[] = JText::_('Payment amount received is different from expected');
}
// Validate currency
if ($order->currency != $this->currency)
{
$errors[] = JText::_('Payment currency is different from expected');
}
}
else
{
$errors[] = JText::_('Order already processed');
}
}
else
{
$errors[] = JText::_('Order not found');
}
return $errors;
}
function validateIpn()
{
// parse the paypal URL
$url_parsed = parse_url($this->action);
$post_string = '';
foreach ($_POST as $field => $value)
{
$post_string .= $field . '=' . urlencode($value) . '&';
}
$post_string .= "cmd=_notify-validate";
$fp = fsockopen($url_parsed['host'], '80', $err_num, $err_str, 20);
if (!$fp)
{
return 'Fsockopen error no. ' . $errnum . ': ' . $errstr . '. IPN not verified';
}
else
{
fputs($fp, "POST " . $url_parsed['path'] . " HTTP/1.1\r\n");
fputs($fp, "Host: " . $url_parsed['host'] . "\r\n");
fputs($fp, "Content-type: application/x-www-form-urlencoded\r\n");
fputs($fp, "Content-length: ".strlen($post_string)."\r\n");
fputs($fp, "Connection: close\r\n\r\n");
fputs($fp, $post_string . "\r\n\r\n");
$response = '';
while(!feof($fp))
{
$response .= fgets($fp, 1024);
}
fclose($fp);
}
if (eregi("VERIFIED", $response))
{
return true;
}
return false;
}
These functions check if the payment is valid (for example: if the amount received from Paypal is the same as the expected one)
Love Factory comes with 3 payment plugins: Paypal, Moneybookers and Sagepay. Make sure you check them also, to get a better understanding of how the system works.
For older version then 1.3.0 having payment facilities:
The needed files and folders are located in the [Joomla folder]/components/com_lovefactory directory, since all the changes are frontend based.
For this tutorial, let's say we want to add the "Paypal 2" payment gateway.
- Add in memberships/tmpl/buy.php (for the smarty templates in smarty/templates/memberships.tpl) in the select with the name "method", the new payment. [<option value="3">Paypal 2</option>]
- Add in the memberships/view.html.php a new value to the $method array, coresponding to the new payment gateway. [3 => 'paypal2']
- Add in the file models/memberships.php around line 63 in the in_array function the new array key [if (!in_array($method, array(1, 2, 3)))]
- Create a new file named "confirm_[name of value added in array].php". [confirm_paypal2.php]
- Following the example of the paypal (confirm_paypal.php) and moneybookers (confirm_moneybookers.php) files, customize the file created on 4 to your specific payment gateway needs.
- In the controllers/memberships.php, following the notify_paypal and notify_moneybookers function, add a new function to handle the response from the payment gateway. The function name must be the same as the "task" value set in the notify link set on 5 [notify_paypal2]
- In models/payment.php following the examples of validatePaypal and validateMoneybookers add a new function [validatePaypal2]. The purpose of this function is to validate and process the response from the payment gateway. Customize it to your specific needs.
You will need to modifiy the "notify" or "status" link and set it to the new payment gateway:
[<?php echo JURI::root();?>index.php?option=com_lovefactory&controller=memberships&task=notify_paypal2&format=raw]
[function notify_paypal2()
{
$payment =& $this->getModel('payment');
$payment->validatePaypal2();
$this->log('Paypal 2');
}]
There is a thin dotted line on each example to show spacing for each object. Format this however you would like using .example.
FORMS SETTINGS
- .button
- The link buttons used in Joomla!
- Example
- .inputbox
- All form input boxes.
- .search
- Formatting the form which holds search items: inputbox, search button.
NAVIGATION/MENU SETTINGS
- a.mainlevel, a.mainlevel:link, a.mainlevel:hover, a.mainlevel:visited
- This styling is for the items in the default MAINMENU. Note: it isn't advisable to keep main menu as horizontal or vertical list. Make it a flat list and style it as a unordered list.
- Example
- #active_menu
- Current page id for highlighting on main menu.
- Example
- ul#mainlevel-nav, ul#mainlevel-nav li, #mainlevel-nav a:link, #mainlevel-nav a:hover, #mainlevel-nav a:visited
- Style for the default TOPMENU. Links are an unordered list.
- a.sublevel, a.sublevel:link, a.sublevel:visited, a.sublevel:hover
- This styling is for menu items that has a parent.
- .pagenavbar
- Sets the style for the footer navigation ("<< Start < Prev Next > End >>") when they do not appear as hyperlinks (when only a few articles exist).
<< Start < Prev 1 Next> End >> - .pagenavbar:link, .pagenavbar:visited
- Style for the footer navigation ("<< Start < Prev Next > End >>") when they become hyper links.
<< Start < Prev 1 2 Next> End >> - .pagenav
- As the name implies, this is for formatting texts for those "<< Start < Previous 1 Next > End >>" links.
- Example
- a.pagenav, a.pagenav:visited, a.pagenav:hover
- Links within .pagenav.
- Example
- .pagenav_prev
- Style for the PREV button. Link is in a th in a table.
< Prev - .pagenav_next
- Style for the NEXT button. Link is in a th in a table.
Next> - a.readon, a.readon:link, a.readon:hover, a.readon:visited
- Style for the "Read More" link that is displayed for large content items
- Read more...
- .back_button
- Style for the "BACK" button.
- .latestnews ul, latestnews li
- Style for latest news list - by default, latest news is user1 module. Links are an unordered list.
- .mostread ul, .mostread li
- Style for most popular list - by default, most popular is user2 module. Links are an unordered list.
CONTENT PAGE SETTINGS
- a.category:link, a.category:hover, a.category:visited
- Styles the category links on LINKS page. The number that follows it is .small. Links are an unordered list.
- Example (5)
- .blog_more, a.blogsection, a.blogsection:link, a.blogsection:visited, a.blogsection:hover,
- Formatting the links in Blog section. .blog_more is the div surrounding the link and .blogsection is the actual link. Links are an unordered list.
- .blogsection strong
- The "More" text in blog section
- More...
- .componentheading
- Title of the component being used to display the content. There are no h tags with this so it will style differently than the next two. It is sometimes wrapped by a table, so if you are having difficulties styling it, try td.componentheading.
- Example
- h1.componentheading
- Title of category when showing catagory titles in content.
Example
- h2.componentheading
- Title of component when using directly in content (Example: Using URL menu item directly to component). Still researching every area this is used in.
Example
- .contentitem h1
- Title on content items.
Example
- .contentheading
- Title of the content, article, etc. being displayed. There is a rumored h2.contentheading somewhere, but I couldn't find it.
- Example
- .contentpane
- Table that holds all non-article information (components, category lists, contact forms, etc). FAQ in default install is wrapped in this.
Example - .contentpaneopen
- Table that holds the actual text for an article.
Example - .contentpagetitle
- Title of articles.
- Example
- a.contentpagetitle:link, a.contentpagetitle:hover, a.contentpagetitle:visited
- Title of articles when appeare as links.
- Example
- .contentdescription
- Formating the "DESCRIPTION" of sections, categories (News/Weblinks/Latest news...).
Example - table.contenttoc
- Formating the table of the Tables of Contents for multiple pages content or article.
- Example
- table.contenttoc td
- Same as above, used to format the td and table cells.
Example - table.contenttoc th
- Same as above, used to format the th of "Tables of Content" ( normally Article Index).
Article Index - table.contenttoc td.toclink, a.toclink:link, a.toclink:visited, a.toclink:hover
- Same as above, used to format toc link texts.
Example
JOOMLA! SECTIONS LISTINGS
- .sectiontableheader
- This is for styling the section table headers on a SECTION's page. Example: table header of "Date", "Item Title", "Author" and "Hits"?
Date - .sectiontableentry1
Example - .sectiontableentry2
Example
JOOMLA! MODULES FORMATTING
A quick note about Joomla! modules. There are 4 settings for Joomla! modules from within the template:
-1 strips out all wrapper code including the title leaving only your module content.
-2 surrounds the module content with a div and places an h3 tag around the title (standards compliant!)
-3 is the same as -2 except that it wraps it with three additional div tags so that you can style custom module backgrounds and borders.
-4 Makes the entire module a table and places the title within a th tag.
- table.moduletable
- [-4 style] Formatting the module wrapper. If you are having any issues styling then write it as table.moduletable.
- Example
- table.moduletable th
- [-4 style] Formatting the module header, and the module titles.
Example - table.moduletable td
- [-4 style] Formatting the table cells of the module table.
Example - .moduletable div, .moduletable div div, .moduletable div div div
- [-3 style] Outer div wrapping for all modules using -3 style.
- Example
- .moduletable h3
- [-2 & -3 styles] Module titles.
Example
- .moduletable ul li
- Style for lists within modules. Example: Polls.
- Example
MISCELLANEOUS
- Dates and Authors
- .createdate
- For styling the date the content/articles are created under contents title.
- Monday, 30 April 2007
- .modifydate
- Formating "Last updated on" text at the end of articles/contents.
- Monday, 30 April 2007
- .small
- Formating "Written by:...." text.
- Example
- .smalldark
- Found in poll result page, for " Number of Voters".. text.
Example Pathway - .pathway_text
- Div that wraps the pathway.
- Home
- span.pathway a
- Text link within pathway.
- span.pathway
- Text within pathway.
- Home
- .pollstableborder
- Set the border properties of the polls voting table (not sure why border isn't showing!)
Example Polls - .poll
- Format the poll container.
- Example
- .pollstableborder
- Set the border properties of the polls voting table (not sure why border isn't showing!)
Example Weblinks - a.category, a.category:link, a.category:hover, a.category:visited
- To format the link's titles under the "Weblinks" section on the frontend. There is mention of a a.weblinks class, but I believe it has been retired. This is also used for listing news categories.
- Example Newsfeeds
- .newsfeedheading, .newsfeeddate, .fase4rdf
- I can't find any place that these are being used. Search page
- .searchintro
- This is for formatting the box with "Search Keyword: test returned 4 matches" box that appears after you have entered a search value It appears on the mainbody with the search results. Text within it is wrapped in a b tag.
Search Keyword Joomla
Total 13 results found. Search for [ Joomla ] with Google- span.highlight
- Highlighted words that match your search word(s).
- Example
JOOMLA! TABBED FRONTEND ADMIN INTERFACE
The CSS below defines how the frontend admin interface when logged in.
Must be logged into the front end to view these styles.
- #overDiv
- Pop-up box giving details in front-end. This will change depending on your css. My css generally is like this to make it look right: #overDiv {font-size:.5em; margin: -21em 0 0 -27em;}
- Example can't be included due to the absolute path needed for the javascript. Mouse over any edit button to see overDiv.
- #toolbar
- The id of the table which contains the SAVE, ACCEPT, CLOSE icons.
Example - a.toolbar
- Styling the SAVE, ACCEPT, CLOSE icon area.
- .tab-row
- Div that wraps tabs
- Example
- .dynamic-tab-pane-control, .tab-page, #content-pane
- The classes and ID's that make up the bar that holds the tabs for IMAGES, PUBLISHING, and METADATA
- Example
- .tab
- For styling of the "Tab" buttons when editing contents through the frontend as admin. This .ontab is the styling for the tab when it is active or after its "clicked".
- Example
- .tab .selected
- For styling of the "Tab" buttons when editing contents through the frontend as admin. This .ontab is the styling for the tab when it is active or after its "clicked".
- Example
- .tab page #images-page table.adminform
- Styles the tabbed page area under the selected tab.
- Example
- .ontab, .offtab, .tabpadding, .tabheading, .pagetext
- There have all been mentioned before, but I haven't found any instance of them in the current Joomla!
- Thanks to: http://www.technoboy.co.uk/webdesign/htmlcss/48-joomlastyles
Getting Started
As guests users have limited access, so you must first create an account. Enter the information required and then the account should be activated via mail or by the administrator himself.
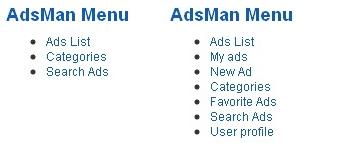
After your Joomla standard account is created and activated, you are required to enter more personal information in order to access certain features of Ads Factory, like posting ads.
To add personal information, go to “User profile” fill in the fields then press save.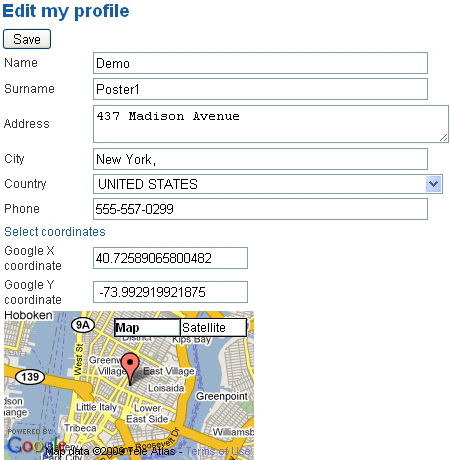
Giving more information about yourself gives the buyer more trust and allows for better communication, phone number and Google coordinates are not mandatory but the more information you give the easier it will be for the buyer to make a decision and contact you.
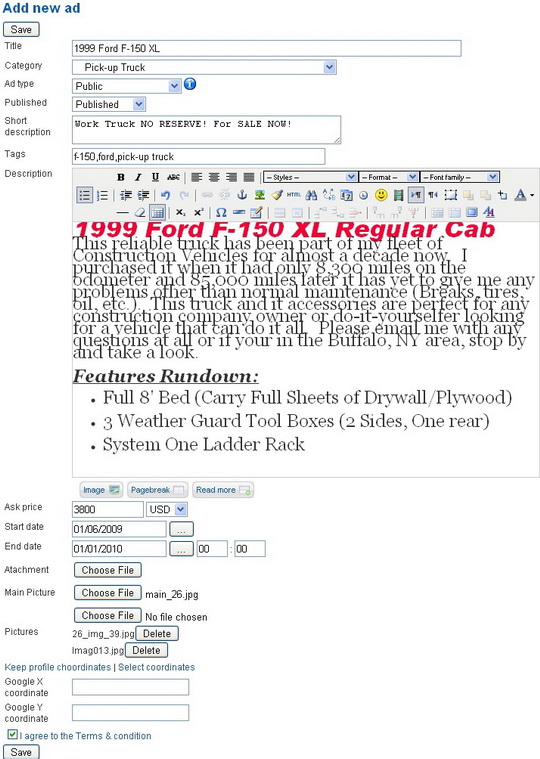
Creating an Ad
Click on “New Ad” in the AdsMan Menu.
The title should specify the item or service you are selling.
Select the apropiate category for the item, some may have sub categories to make finding your Ad easier.
Ad type:public or private,whether or not your details can be viewed by guests or members.
For the Ad to be shown on the site,you must select “Published”.
Tags are key words that best describe or categorise the Ad,they can also be words in your Title and Description.Write whatever you think will make your Ad easier to find.
Attachement: a file related to the Ad can be uploaded here. Schematics, recipts or anything else you can find about your product.
Main Picture: this is the picture that will first show when someone looks at your Ad,more pictures can be added with the “Pictures” option.
If you are selling a property,or just want to show where the buyer can pick up an item,Google Map Coordinates can be added,you can get these from http://maps.google.com/.
Read the Terms & condition, mark the box and press “Save”
User Menu
In Ads List you can view all the ads on the site, the viewing options are: grid, list and number displayed.Archive ads are the ones that have expired and remain saved in the database.
There are also 3 sorting methods: Date – Oldest to Newest; Title – Alphabetically and
Price – Highest to Lowest.
Gold Featured ads will show with a bright yellow backround and always be on top in list view.
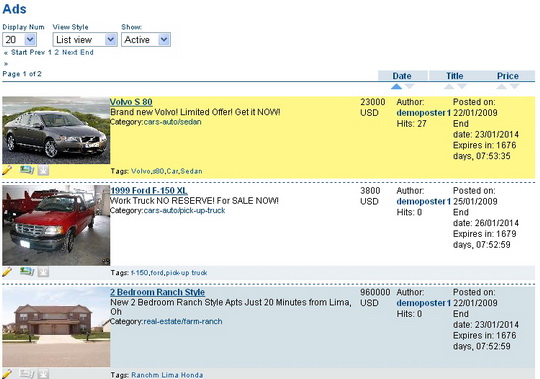
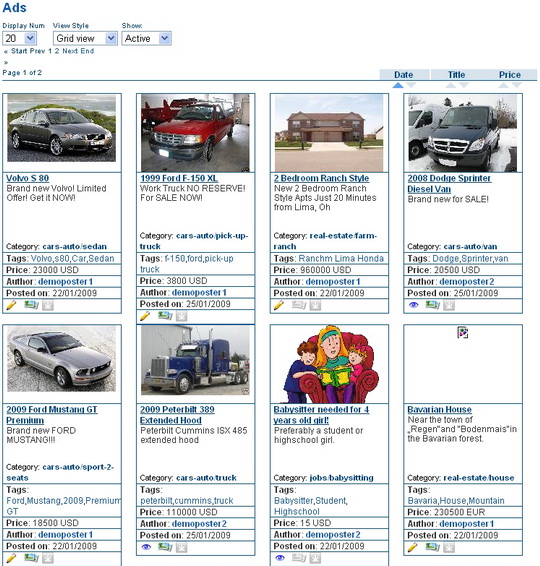
Under the picture of an ad you can get some information about it: a quick add to your Watchlist/Favorites and wether or not the ad has more pictures or an attachment.

To add an ad to your Watchlist,click on the eye icon when viewing it.
To remove it from Watchlist/Favorite click on the icon again.
The 2nd icon shows if the ad has more pictures, if it is highlighted then the ad has more images, same goes for the 3rd icon which is for Attachments.
If the ad you are viewing was posted by you, instead of the eye icon you will see a crayon, clicking on it will open the edit menu for the ad.

Favorite ads can be seen in the Favorite Ads section, when one of your favorite ads expires you will receive an email announcement.
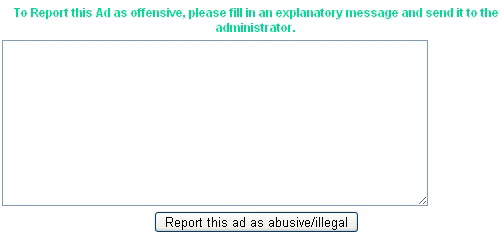
In the detailed view of the ad the reporting icon will show, to report an ad you will be required to give a reason. Downloading an attachment or reporting the ad can also be done here.
If the ad has more pictures you can view them in a slide window, clicking on them will open the full size picture.

In the Categories section you can view every category, clicking on one will show all the ads from that specific category, if you click on (plus sign) the category will be added to your watchlist meaning you will receive an email announcement everytime a new ad is posted in that category.
To remove it from watchlist click on the (minus sign) that will replace the green plus sign.
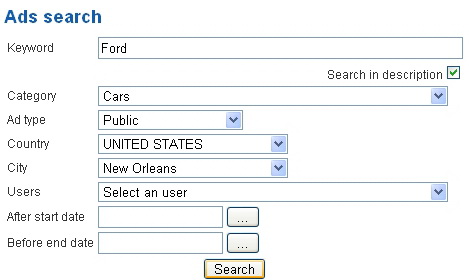
In the Ads search section you can find ads by different criterias,such as:
Country,City or words in the description.
Revised "Ads Factory" version 1.3.5.